Enact Frequently Asked Questions (FAQs)
Logging in
Please examine the list below for your issue and the resolution:
-
User Account End Date Expired
-
Login Message: User Deactivated
-
Resolution: Your Enact System Administrator must update the user account end date.
-
-
User Exceeds Bad Password Login Attempts
-
Login Message: User Deactivated
-
Resolution: The Enact user must select Forgot Password at login, which resets lockout and initiates a password change.
-
-
User or Workstation license not assigned
-
Login Message: Not Licensed
-
Resolution: Your Enact System Administrator must assign a license to the user or the workstation.
-
-
Administrator or User email incorrect, so user is not getting access emails
-
Login Message: Bad Credentials and not receiving access emails
-
Resolution: Your Enact System Administrator must correct the user's email address.
-
-
User assigned to no process Access Level in user edit
-
Login Message: No Access Level
-
Resolution: Your Enact System Administrator must set the user Access Level.
-
-
There is no common process for the User Access Level and workstation Access Level at login
-
Login Message: No Access Level
-
Resolution: Your Enact System Administrator must set the Access Level of the user and/or the workstation to contain a common process.
-
-
User Role not assigned or restricted
-
Login Message: Invalid Permissions
-
Resolution: Your Enact System Administrator must assign the user to a role.
-
When you log into Enact for the first time using a specific browser/device combination, you must authenticate that workstation by entering your Access Code and selecting your Workstation Name.
For more information, please see Authenticating Workstations. For additional questions on authenticating your workstation, please consult your Enact System Administrator.
If you want configure Enact to allow logging in and authentication through your Azure AD or Okta Single Sign-On (SSO), please contact InfinityQS Technical Support online to enable this functionality. With Single Sign-On (SSO), you will sign in and authenticate using your Azure Active Directory or Okta, allowing you to maintain a single location for user IDs and passwords across your enterprise.
Enact uses browser cookies to authenticate workstations. You should only need to authenticate a workstation once for a given device and browser. If you are asked to authenticate a workstation multiple times, it may be a result of one of the following:
-
You are using a different browser. For example, if a workstation is authenticated with Microsoft Edge, Enact will not recognize a Google Chrome session on the same computer unless the Google Chrome session is also authenticated.
-
You are using a different system user account. Operating systems (for example, Windows) assign browser cookies to a particular system user, so other users on the same PC will need to authenticate their browser separately.
-
Your browser cookies are being deleted. For example, some security software can be configured to automatically delete browser cookies when the browser is closed. If this feature is enabled, you will need to re-authenticate Enact every time the browser is re-opened. Disable this feature or add *.infinityqs.com to an approved list to avoid this problem.
To change your password:
-
Log into Enact.
-
Select User Settings and then select My Settings.
-
On the Settings page, select Change Password.
-
You can now configure your new password in the Change Password page.

If you have forgotten your password, please see Logging In for more information on resetting your password.
This message means that you have not yet been assigned a license to use Enact. Please contact your Enact System Administrator to have a license assigned to your user account.
Using the InPrivate Browsing in Microsoft Edge or Incognito Mode in Google Chrome, multiple users can log into Enact from the same session on a workstation.
Using and Navigating Enact
When you try to open Enact pages that your account does not have access to, Enact displays the message, "Unauthorized Access: You don’t have permission for requested resource."
-
Example 1: You do not have Work Dashboard enabled and you select a browser bookmark or email link to the Work Dashboard.
To avoid receiving this message, ensure all of your bookmarks and links point directly to the Enact root address (https://enact.infinityqs.com/), instead of a specific dashboard.
-
Example 2: You navigate to a process (or process-related item) that is outside of your user access level.
Because your access level determines your account's permission to view data and data structure for a section of the process hierarchy, Enact will not allow you to access items outside of that section. For more information about Access Level, please see Editing Users.
Enact bases your time zone on your system time, and your date/time format on the Preferred Language selection in your user settings. If you set Preferred Language to Default, Enact bases your date/time format on the Language selection in your browser. For more information, please see Configuring User Settings.
Using this procedure, you can permanently delete records marked for deletion (for example, parts, processes, features, manufacturing limits, etc.). After you purge data, that data is removed from the database entirely and cannot be recovered by any means, including by InfinityQS.
-
Select Access Menu and then select Data Management | Data Purge.
-
In the Data Purge page, select Purge, and in the Purge All Items dialog box, select OK.
After initiating the database purge, you may continue performing other functions in Enact.
If the data is purged, it cannot be recovered by any means. Otherwise, you can restore Parts, Processes, Features, and Manufacturing Limits once removed in Enact. Refer to the following links for instructions on how to restore them:
You can monitor all record edits that occur in Enact for security and traceability in Change History. The details include who made the change, when the changes were made, and what the change affected. To access Change History, select Access Menu and then select Data Management | Change History.
Enact does not provide a method of bulk-deleting or bulk-hiding events. You can configure parameter sets and filters to display the desired events.
While you can delete a process to delete associated events, this will also delete all data and other content associated with that process.
After you create control limits for a particular data stream (part, process, feature), you must keep some control limits in place for that stream. You can edit existing streams, and if multiple historical limits exist, you can remove individual limits, but you cannot remove all control limits for that stream. For more information on removing individual limits, please see Removing Control Limits.
Please ensure that your IT department has added infinityqs.com under the bypass authentication on your proxy server.
Most text fields in Enact (including "Name" fields) have a length requirement of 50 characters or less. "Long Name" fields have a length requirement of 500 characters or less. Enact is fully Unicode-compatible. All characters are supported except for the following restricted characters:
-
( Left parenthesis
-
) Right parenthesis
-
| Pipe ("Process Name" field only)
The "Long Name" field is an optional field for certain record types. It can be used as a description, reference, or comment section for users creating or editing the data structure. The long name does not show up outside of the Create and Edit pages.
When creating a checklist feature, the "Long Name" field is replaced with a "Question Text" field, which will be presented as a prompt to the user completing the checklist.
During data collection, Enact displays collection instructions from the Long Name data field of the Feature, if there are no instructions in the Description data field of the Part Feature Details.
Yes, Enact restricts the number of records in a Parameter Set to 100,000 records.
Enact users may be assigned various Roles. The items that appear in your Menu, known as your “Menu Template”, are dependent on your Enact Role.
Please contact your Enact System Administrator for more information on your Enact Role and Menu Template.
If you are unable to see all of the assigned levels of your Process Hierarchy, please go to Security | Workstations in the Enact access menu and check the Access Levels assigned to the workstation.
Please ensure that you have listed *.infinityqs.com as a trusted domain in your network settings. Additionally, ensure that you have configured your browser to Always Allow cookies from those sites. For example, in Microsoft Edge, browse to edge://settings/content/cookies.
Data Collection
Within the Data Collection Dashboard Tile, there may be a number of Sub-Tiles displaying Data Collection names. Selecting a Sub-Tile will initiate Data Collection and you will be able to enter data.
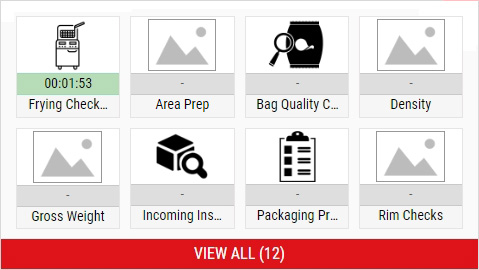
Work Dashboards will always have a Data Collection Tile while custom Dashboards may or may not.
Please contact your Enact System Administrator for questions on which Dashboard you should be using for your Data Collections.
For more information about data collection, please see Collecting Data.
For details on pausing a timed data collection, please see Pausing Timed Data Collections.
With production assignments, you can assign parts to a process, limiting the part selection list after you select a specific process. If you assign only one part to a process (in other words, Process A only generates Part 1), Enact automatically selects that part after you select the process, hiding the part selection during data collection. For more information, please see Creating Production Assignments.
This is a two-part procedure, as described below:
- To receive notifications by email when an event occurs, you must first opt-in for those email messages. For more information, please see Notifications Tab in Configuring User Settings.
- To configure real-time triggers that issue warnings by email when an event occurs, you must configure Notification Rules for the specific events, including limit violations, due data collections, defectives, etc. For more information, please see Creating Notification Rules.
Data you’ve entered is displayed in Dashboards. Dashboards are customizable, and the information displayed on them may vary.
By default, Enact has a preconfigured Dashboard called a “Work Dashboard”. If you have been assigned a Work Dashboard, data you have recently entered should be available in the Finished Items Tile at the bottom right corner on your Work Dashboard. The tile should have the name of the Data Collection along with the Process and Features on which the collection was performed.
If you have entered no data, the Tile will display the message, No Finished Item Detail.
For more information on how your Dashboards are configured, please speak to your Enact System Administrator.
Aggregated Dashboards
Aggregated dashboards are built for larger sets of historical data, which Enact aggregates periodically in the background. Current data has not yet been aggregated, and therefore will not yet appear on aggregated dashboards. To view current (or "live") data, use raw dashboards. To understand how and when the data aggregation works, consider the following:
-
Daily Aggregation. From midnight to midnight in the process's time zone, Enact summarizes one whole day of data at a time. Enact checks for new data to aggregate every hour, so you will be able to see the previous day's data around 01:00 AM local time. When you use a dynamic or static time window or an aggregated dashboard, Enact returns data for your time window in whole-day increments. You can view one day or multiple days, but only in increments of whole days.
-
Shift Aggregation. Fifteen minutes after a shift ends, Enact summarizes the entire shift's data for each process. If you set your parameter set to By Shift | Previous Shift instead of Dynamic Time or Static Time), Enact uses the previous shift's aggregated data instead of the daily aggregation.
-
Lot Aggregation. When you set a lot's testing status to Testing - Complete, Enact immediately assembles data for the Lot Report, which disregards the parameter set's Time Window setting. For more information, please see Managing Lot Report Tiles.
-
Hourly Aggregation. Once every hour, Enact checks for previously aggregated data that's been edited, and re-aggregates the data using the edits. Enact will not re-aggregate data older than six months.
You can use any parameter set for an aggregated dashboard, but it will differ from a raw dashboard, as follows:
-
Time Window. To view daily aggregated records, set the Time Window using Dynamic Time or Static Time. As stated above, Enact summarizes whole days of data at a time in midnight-to-midnight increments in the process's time zone.
-
By Shift | Previous Shift. To view the previous shift's aggregated records, configure By Shift | Previous Shift. As stated above, Enact summarizes the entire previous shift's data for each process.
-
Lot. To view a completed lot's aggregated records in the Lot Report, configure By Lot. As stated above, Enact immediately assembles data for the Lot Report, which disregards the parameter set's Time Window setting. For more information, please see Managing Lot Report Tiles.
Because some parameter set fields do not apply, aggregated dashboards ignore the following parameter set fields: Hours/minutes, Shift, Lot (except for the Lot Report), and Data Collection Type.
You may notice discrepancies between the data in your raw dashboards and your aggregated dashboards. This is entirely expected, given the nature and purpose of the two dashboard types, and you can identify one or more of the reasons for the differences in the following list:
-
Non-Aligned Time Window
Unless you set Time Window to Previous Shift, Enact only displays aggregated data in midnight-to-midnight time windows, so you would need to configure the parameter set with a midnight-to-midnight time window as well.
-
Lot Report Tile
The Lot Report tile displays data for the selected lot in its entirety, regardless of the time window. For more information, please see Managing Lot Report Tiles.
-
Non-Aggregated Filters
Enact cannot filter aggregated data by data collection type, code, shift (unless you set Time Window to Previous Shift), or lot (unless you're using the Lot Report). You can only configure parameter sets or filters using these descriptors for raw data.
-
Tile Types
There are tiles that only display certain types of data. For example, the Box & Whisker tile does not display attribute (defect or defective) data or checklist data. For more information about specific tiles and their contents, please see the tile links in Adding Tiles.
-
Changing Manufacturing Limits
When you change manufacturing limits, raw data will immediately use the updated limits, but aggregated data will not be re-aggregated, instead continuing to use the old limits. Consider the following examples:
-
Increased specification tolerance after aggregation: Capability indexes (Cp, Pp, etc.) will increase on raw data only.
-
Added reasonable limits after aggregation: Subgroup count may decrease and SD(ST) and SD(LT) may decrease on raw data only, improving capability indexes.
-
Added process-specific limits: Override non-specific limits on raw data only.
To troubleshoot, do the following:
-
For the given data stream, verify the change history of the manufacturing limits. For more information, please see Managing Change History (Manufacturing Limits). If the manufacturing limits were changed during the selected timeframe, you will see discrepancies between the raw data and aggregated data.
-
To identify unreasonable values, check for different measurement or piece counts.
-
Keep in mind that Enact applies reasonable limits to newly created manufacturing limits automatically, using a multiplier to determine the setting. For more information, please see Limits Tab in Configuring Global Settings.
-
-
Changing Process Time Zones
While rare, it is possible that a changed process time zone could cause discrepancies, since aggregated data always uses midnight-to-midnight time windows, which may not align with the raw data time window. To troubleshoot, you can examine the Last Updated data field in the Processes landing page. For more information, please see Managing Processes.
-
Software Updates
As InfinityQS introduces new functionality to Enact, the scope of aggregation can change and expand, which means new aggregation functionality would not be available in past data. For more information, please see What's New in Enact.
Automated Data Collection (ADC)
Using the Subgroup Data Collector, you can acquire live data from InfinityQS DMS, compiling it into subgroups, and then delivering those subgroups to Enact using a web-based transport. Prior to creating the Subgroup Data Collector, you must interface DCS to Enact.
For more information about interfacing DCS to Enact, please see Configuring DCS for Enact.
Yes, but only if the part family name and process model are included in the subgroup data. For more information, please see Descriptors Tab in Data Collection Service (DCS) or Creating Enact Writer in Enterprise Integration Service (EIS).
The DCS API has a built-in buffer to make searches and saves faster. You must restart DCS to reset its internal buffer, removing all references to the deleted part, process, test, or lot. This allows you to import the same part, process, test, or lot.
Access Levels
Enact will only allow a user to access processes shared between the user’s access level and the workstation access level. For example, if an administrator logged into a workstation with a restricted access level, the administrator would only be able to see and interact with processes available from the user account and the workstation. Regardless of the user license status, Enact would restrict process visibility based on the workstation’s limited access level.
Dashboards
Two common reasons that you’re seeing different data on your Dashboard than you expect are:
-
Incorrect Parameter Set
The data displayed on a custom Dashboard is determined by the Parameter Set being used. To check which Parameter Set is assigned to the Dashboard, select Select Parameter Set on the top right of your Dashboard, which displays all the available Parameter Sets in the system.
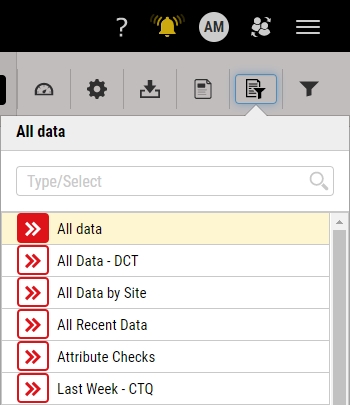
For more information on creating and managing Parameter Sets, please see Managing Parameter Sets.
-
Filter set on the Dashboard
To check whether a Dashboard Filter is set, in the toolbar, select Filter Parameter Set. In order to clear the filter, select Clear. The Dashboard will display all the data associated with the Parameter Set.
For more information on Filters, please see Filtering Dashboard Parameter Sets.


The data displayed on your dashboard depends on the processes that have been assigned to you. You can modify your selected processes by selecting User Settings and then selecting My Processes.
For more information about selecting processes, please see Selecting My Processes.
Within the parameter set's Time Window, Enact displays the most recent records (by creation time) up to the parameter set's record limit, as follows:
-
Raw Dashboard. There are the following three data types on a raw dashboard:
-
Subgroup / Checklist Data. Each value or checklist question's response will be one record. For example, when you collect data for 3 features with a subgroup size of 3, each of those 9 values will be one record, for a total of 9 records. For within-piece data, each within-piece value will be one record. Within the parameter set's Time Window, Enact displays the most recent records (up to the record limit) on all tiles displaying subgroup or checklist data, which may result in only part of the data displaying, if the cutoff occurs within the data set.
-
Process Event Data. Each event will be one record. Within the parameter set's Time Window, Enact displays the most recent records (up to the record limit) on all tiles displaying event data, which is separate from the subgroup and checklist data above. For example, if you set the record limit to 5000, Enact can display up to 5000 subgroups and 5000 events on the dashboard.
-
Compliance Data. Enact does not apply the record limit to compliance data.
-
-
Aggregated Dashboard. Aggregated dashboards can display far more data for a given parameter set than raw dashboards. For daily aggregation, the entire day's data for one part, one process, and one feature will be one record. For shift-based aggregation, the entire shift's data for one part, one process, and one feature will be one record.
When the record limit results in an incomplete data set, Enact displays a record limit warning. To resolve the record limit warning, you must modify the parameter set to reduce the total number of records. You must avoid exceeding the record limit, since the generated tables, graphs, and calculations, which are based on all of the requested data, could be inaccurate.
After the parameter set selects the data, restricting the data based on the Time Window and the record limit, the dashboard filters narrows the data even further. For example, if you set the record limit to 5000 and then apply a Part dashboard filter, Enact filters only those 5000 values by part. Enact does not select a new data set based on the dashboard filter.
Charts and Statistics
Control Charts can be viewed from the Stream Summary Tile on a Dashboard. The Stream Summary tile may contain many Sub-Tiles which display out-of-specification pieces and out-of-control subgroups. Select any of the Sub-Tiles to reveal options for displaying Histograms, Control Charts, and Event Pareto charts.
For more information about the Stream Summary tile, please see Managing Stream Summary Tiles.
Statistics on the Box and Whisker tile are standardized. The mean and standard deviation on the Box and Whisker tiles will be the standardized mean and standard deviation in contrast with the Control Chart.
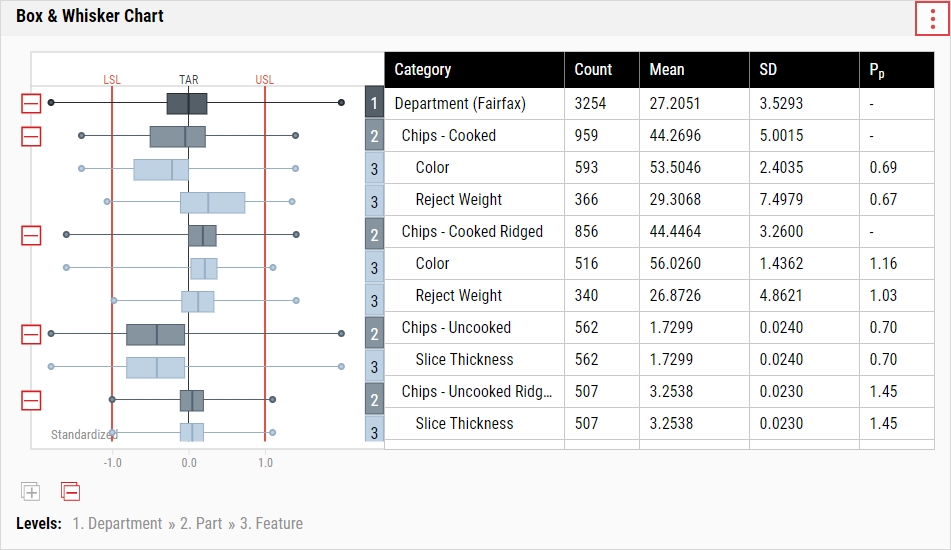
In the Box & Whisker and Pareto tiles, Enact organizes the selected levels by number and indent, and includes a legend at the bottom to identify the level categories. In order to view this information correctly, you must set your computer's display scaling to 100%. If you do not set your computer's display scaling to 100%, Enact may render the report contents misaligned, and the level numbering will not correspond to the category entry.
Documents
Please see our Document Library, located here: Enact Document Library.
Architecture and Security
For more information, please see the Enact Security White Paper.
Hardware
-
In the MicroRidge software, set the output string to include the channel ID.
-
In Enact, publish the channel ID as a field in the Enact gauge format.
-
Use the Exclusion Rules to ignore other channel numbers.
The InfinityQS technical experts have provided a troubleshooting guide for Gauge Agent, which will walk you through all the steps to ensure your Gauge Agent is configured and running correctly. To troubleshoot your installation of Gauge Agent, please follow the steps included in the Gauge Agent Troubleshooting Guide.
To test your gauge configuration, you must open the Gauge Formats page from the Gauge Devices page, as follows:
-
In the Gauge Devices landing page, select Create Gauge Device or select Edit for the desired gauge device.
-
In the Gauge Format drop-down list, select Add or select an existing gauge format and then select Edit.
-
In the Gauge Formats page, you can now test the gauge configuration, sending values from the gauge and reading the ASCII strings.


Once you have opened the Gauge Formats page, you can test the gauge configurations. For more information, please see Creating Gauge Formats.
New Tenants
InfinityQS includes the top five levels predefined using generic names (Company, Division, Region, Site, and Department), which you can change to any name you want.
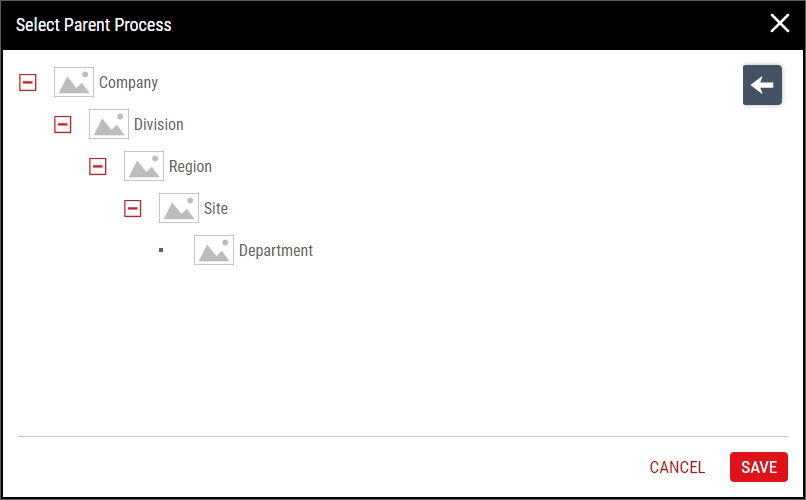
The access level of Default Workstation is Company.
InfinityQS only includes the Admin user, assigned to the Admin role.
If every Enact user has a license, you could simply authenticate the Default Workstation. However, InfinityQS recommends authenticating each one of your workstations, since you can restrict access to functionality within the software, including Manual Data Collection and Notifications, to specific workstations. This gives you more control over functionality restrictions within your enterprise, and it would be quicker to modify functionality restrictions for dozens of workstations instead of hundreds of individual users.