Collecting Data
Using this procedure, you will collect variable or attribute data.
-
In the dashboard, locate the Data Collection tile, and then select the desired data collection.
-
If a prompt titled Select the lot for <DATA COLLECTION NAME> for Lot Genealogy creation or verification appears, note the output lot number at the bottom of the prompt. If this is the correct lot number for your data collection, click it. If it isn't, search for the lot number using the Lot text box in the middle of the prompt and, once you locate the lot number, click it. This results in the display of either a Create Lot Genealogy Assignment prompt or the Lot Genealogy Verification page; the former if no lot genealogy assignment has been created and the latter if one has. If it is the Create Lot Genealogy Assignment prompt that is displayed, complete step 3 below. If it is the Lot Genealogy Verification page that is displayed, just complete step 4.
-
Complete this step if, in step 2, the Create Lot Genealogy Assignment prompt appeared after selecting a lot number in the Select the lot for <DATA COLLECTION NAME> for Lot Genealogy creation or verification prompt.
-
In the Create Lot Genealogy Assignment prompt, enter the Output Part and the Output Lot and click OK. (If only one output part and one output lot exist, these will be defaulted and you can simply click OK.)
-
In the Lot Genealogy Verification page that appears, click the Add Input Lot button in the upper right and, in the Add Input Lot form, add the Input Part, Input Lot, and Begin Time. Then click ADD & ASSIGN ANOTHER if you need to add another input lot or ADD if you only need to add the one.
-
If after attempting to add an input lot you get a Warning Message indicating no lot is associated with the input part, contact your supervisor or administrator and click OK. He or she will need to associate a lot with the input part before you can complete the lot genealogy assignment.
-
-
Complete this step if, in step 2, the Lot Genealogy Verification page appeared immediately after selecting a lot number in the Select the lot for <DATA COLLECTION NAME> for Lot Genealogy creation or verification prompt.
-
In the Lot Genealogy Verification page, look over the input lots listed.
-
If these are complete, click the Continue button in the lower right.
-
If these are incomplete, click the Add Input Lot button in the upper right and, in the Add Input Lot form, add a missing Input Part, Input Lot, and Begin Time. Then click ADD & ASSIGN ANOTHER if you need to add another input lot or ADD if you only need to add the one.
-
-
Upon opening the data collection, Enact may prompt for one or more descriptors. For more information, please see the following:
-
Process
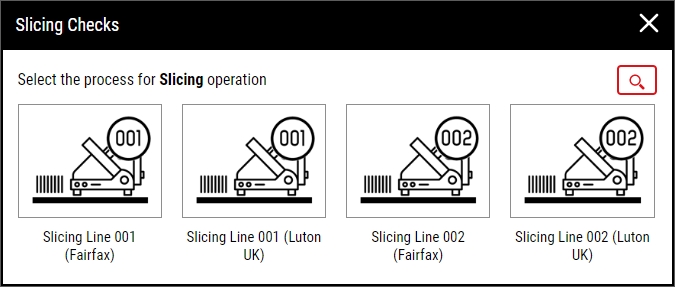
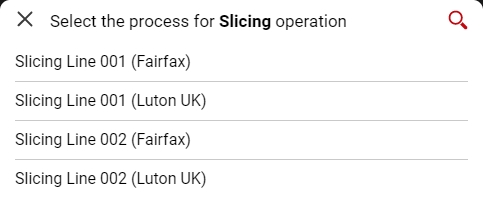
In the process selection dialog box, select the desired process.
How do I filter?To filter the list, select Filter, and then begin typing a string within the process. For example, to locate Process Name, you can type pro or you can type nam.


-
Part
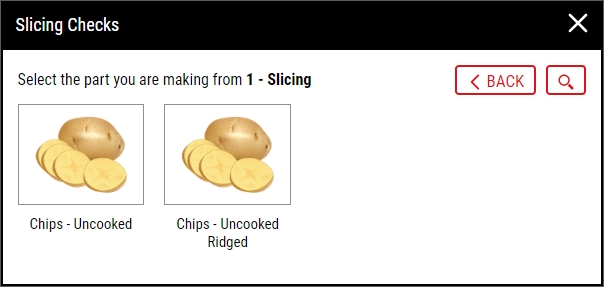

In the part selection dialog box, select the desired part.
How do I filter?To filter the list, select Filter, and then do one of the following:
- In the Part data field, begin typing a string within the part. For example, to locate Part Name, you can type par or you can type nam.
- In the Part Family drop-down list, select the desired part family.


-
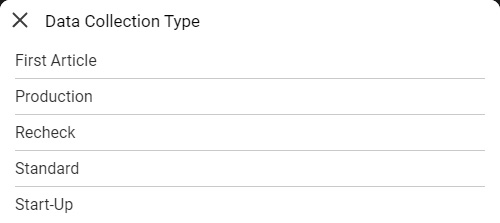
Data Collection Type
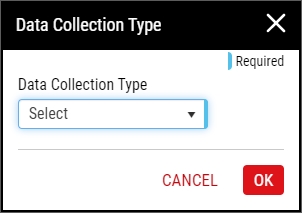
In the Data Collection Type drop-down list, select the desired data collection type, and then select OK.
In the Data Collection Type dialog box, select the desired data collection type.
Enact populates the list based on the data collection configuration settings. For more information, please see Required Information Tab in Configuring Data Collection Settings.
-
Subgroup Label
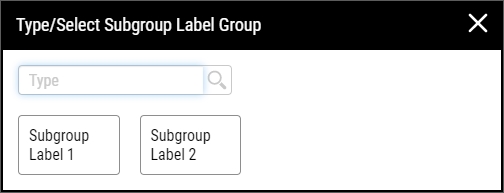
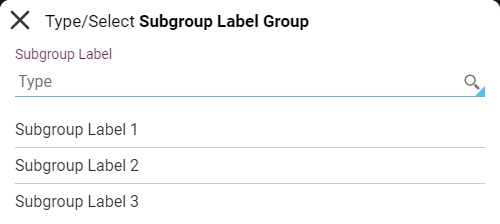
In the subgroup label selection dialog box, select the desired subgroup label.
- To locate a specific subgroup label, type the full name of the subgroup label in the search data field, and then select the subgroup label.
- To add a new subgroup label, type the full name of the new subgroup label in the search data field, and then select the new subgroup label.
Enact displays and controls the subgroup label selection dialog box based on the data collection configuration settings. For more information, please see Required Information Tab in Configuring Data Collection Settings.
Where are my subgroup labels?When there are more than 200 subgroup labels to select from, Enact hides the subgroup labels at the bottom of the dialog box and only displays the search data field, allowing you to manually locate the desired subgroup label.
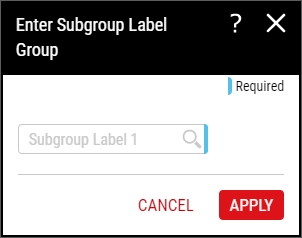
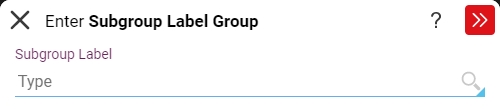
In the subgroup label selection dialog box, do the following:
- To locate a specific subgroup label, type the full name of the subgroup label in the search data field and then select Apply.
- To add a new subgroup label, type the full name of the new subgroup label in the search data field and then select Apply.
-
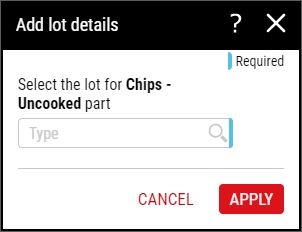
Lot
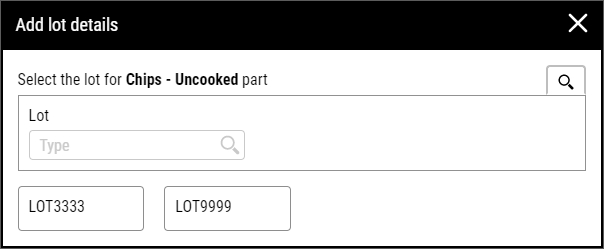
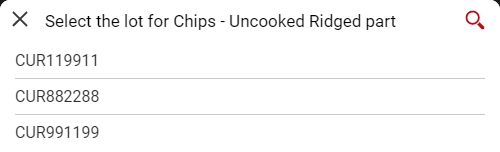
In the lot selection dialog box, do the following:
-
Select the desired lot at the bottom of the dialog box.
If you are using lot-site assignments, Enact displays available lots based on the site of the data collection process, and not by your location. For more information, please see Creating Lots.
To add a new lot, type the lot name, and then select Add. By default, Enact assigns the lot to the site of the data collection process.
- To search for the lot, select Search

-
Please note the following:
- Enact will only allow you to view and select lots with Lot Testing set to Released.
- If you configure production assignments, Enact only displays available lots for the active part, though you can select Search to see all available lots with Lot Testing set to Released.
- If the active part only has one lot assigned through production assignments, Enact will automatically select this lot, and will not require you to make a selection.
Enact displays and controls the lot selection dialog box based on the data collection configuration settings. For more information, please see Required Information Tab in Configuring Data Collection Settings.
Where are my lots?When there are more than 200 lots to select from, Enact hides the lots at the bottom of the dialog box and only displays the search data field, allowing you to manually locate the desired lot.

In the Lot drop-down list, select the desired lot and then select Apply. Hint
-
-
-
In the Lot Genealogy Verification page that appears, if the lot genealogy is correct and the Save & Continue button in the lower right is enabled, click that button. Otherwise, click the Add Input Lot button in the upper right and, in the Add Input Lot form, add the correct Input Part, Input Lot, and Begin Time. Then click ADD & ASSIGN ANOTHER if you need to add another input lot or ADD if you only need to add the one. If after attempting to add an input lot you get a Warning Message indicating no lot is associated with the input part, contact your supervisor or administrator and click OK. He or she will need to associate a lot with the input part before you can complete the lot genealogy assignment.
-
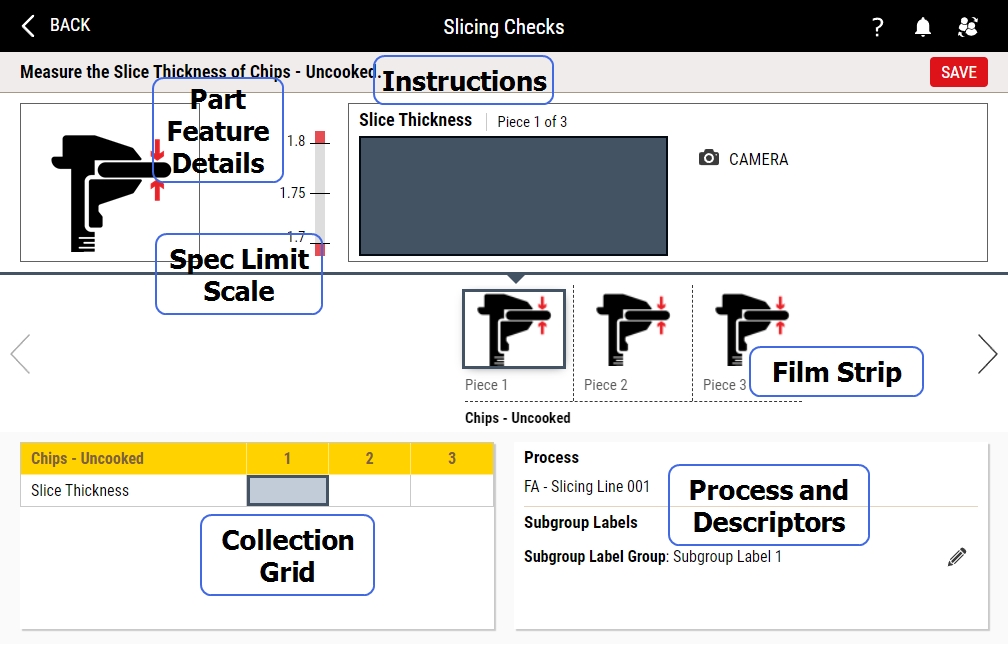
In the data collection page, collect variable or attribute data. For more information, please see the following:
Collecting Variable DataCollecting variable data is used when the test has measured values such as diameter, temperature, weight, height, etc. When creating a feature, select Variable from the drop down list under Type.
-
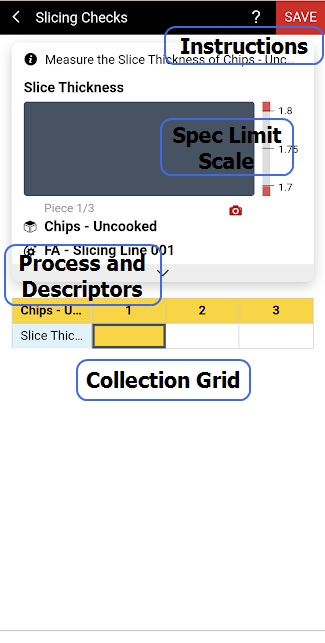
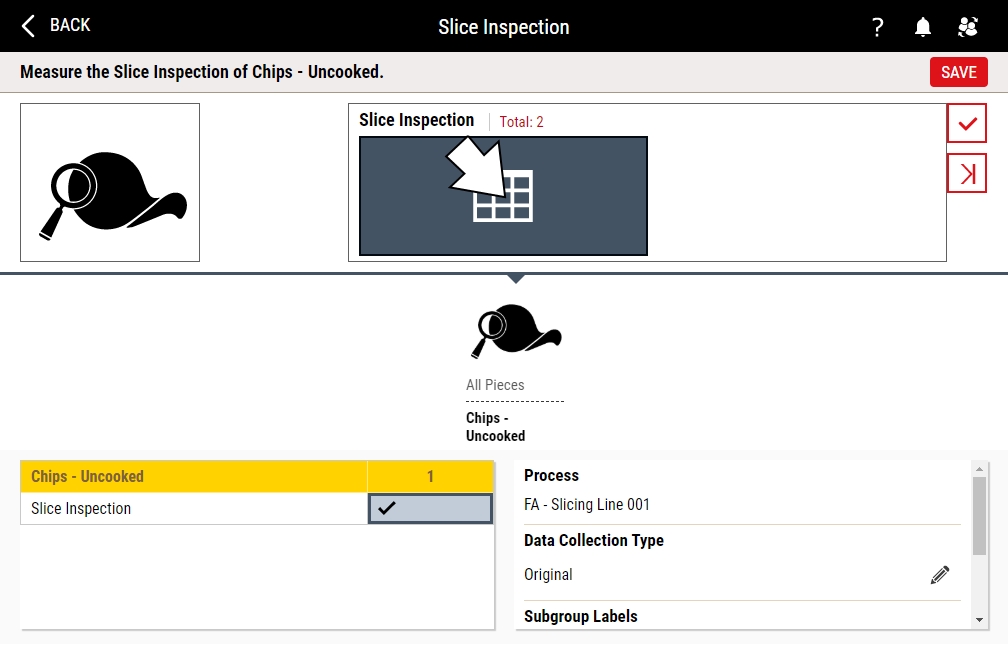
Examine the variable data collection page.
-
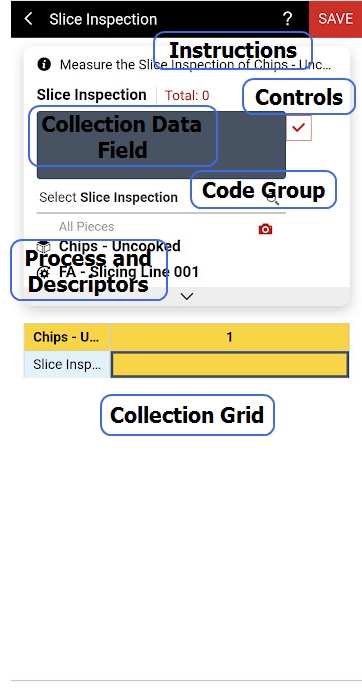
Instructions. Enact displays the instructions from the Description data field of the Part Feature Details. For more information about the Part Feature Details, please see Creating Part Feature Details.
If there are no instructions in the Description data field of the Part Feature Details, Enact displays the instructions from the Long Name data field of the Feature.
If there are no instructions in the Description data field of the Part Feature Details or the Long Name data field of the Feature, Enact displays the following default message: "Measure the [Feature Name] of [Part Name]."
-
Current Part Feature Details. Enact displays the Part Feature Details Optional Image.
By default, Enact displays the Part Feature Details Optional Image.
- If you did not configure the Part Feature Details Optional Image, Enact displays the feature image.
- If you did not configure the feature image, Enact displays the part image.
- If you did not configure the part image, Enact displays the generic image.
- Spec Limit Scale. Enact displays a graphical representation of the upper specification limit, target, and lower specification limit, highlighting the location of the current measurement on the scale.
-
Collection Data Field. Type the collected data.
-
Film Strip. Enact displays a graphical timeline of the required piece measurements for features in this data collection, highlighting the current feature. To select a previous or upcoming piece measurement, select that entry in the film strip.
In the film strip, Enact identifies by symbol whether a collected measurement is outside of warning limits or outside of specification limits.
-
Collection Grid. Enact displays a grid of the status of collected and expected piece measurements for features in this data collection. To select a previous or upcoming piece measurement, select that entry in the collection grid.
In the collection grid, Enact identifies by symbol whether a collected measurement is accepted, outside of warning limits, or outside of specification limits.
- Process and Descriptors. Enact displays the current process and any other descriptors, including lot and data collection type.
-
(Subprocess-Based Collections) For data collections with subprocesses, Enact displays the subprocess identifier inline with the feature name (e.g., "Full WT – Valve 03") throughout the data collection interface, making it easy to identify which subprocess you are measuring. For more information, see Optimizing Data Entry for Subprocess Collections.
-
(Performance Optimization) Enact has been optimized for subprocess-based data collections with 150+ subprocesses, ensuring fast and responsive data entry without keystroke lag or delays.
-
-
To collect variable data, do the following:
- In the collection data field, type the piece measurement.
-
(Optional - Subprocess Collections) For features configured with Apply All capability, if the sample measurement is the same for all subprocesses (such as tare weight or environmental conditions), select the Apply All button to automatically populate all subprocesses with the same measurement. Doing this displays a Confirmation Message, informing you that manufacturing limit violations may occur from this acton. If you are okay with this outcome, click OK; otherwise, click Cancel.
NOTE: If there is a sample value that is applicable to some but not all of the subprocesses, you can enter values for the subprocesses to which the value is not applicable and then enter the value that is to be shared and select the APPLY ALL button. In this case, the button effectively acts as an Apply All Remaining button and won't overwrite the previously entered values.
- When finished, press ENTER. Enact automatically selects the next available feature.
-
To modify the selected descriptors, do the following:
-
Locate the Descriptors section.
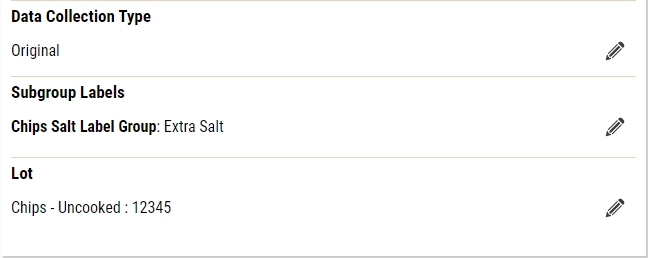
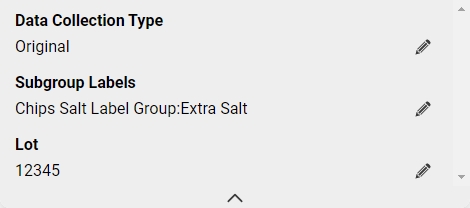 Where are my descriptors?
To view your descriptors, select Expand.
-
In the desired descriptor, select Edit.
Enact does not allow you to modify the process or part.
-
-
Repeat the above steps for all measurements in every feature.
-
Collecting Attribute DataCollecting attribute data is used for defect and defective features. Defect features are the total number of defect occurrences during an inspection. Multiple defects may occur on a single piece. Defective tests are the number of pieces that failed a particular inspection. A single piece is either defective or not. When creating a feature, select Defect or Defective from the drop down list under Type.
(Boolean Logic Features) If your data collection includes Boolean logic features (such as dual verification requirements), Enact validates all Boolean rules before allowing you to save. If a Boolean validation fails (for example, if the same panelist was selected twice when different panelists are required), you must correct the issue before saving. For more information, see Configuring Verification Features.
-
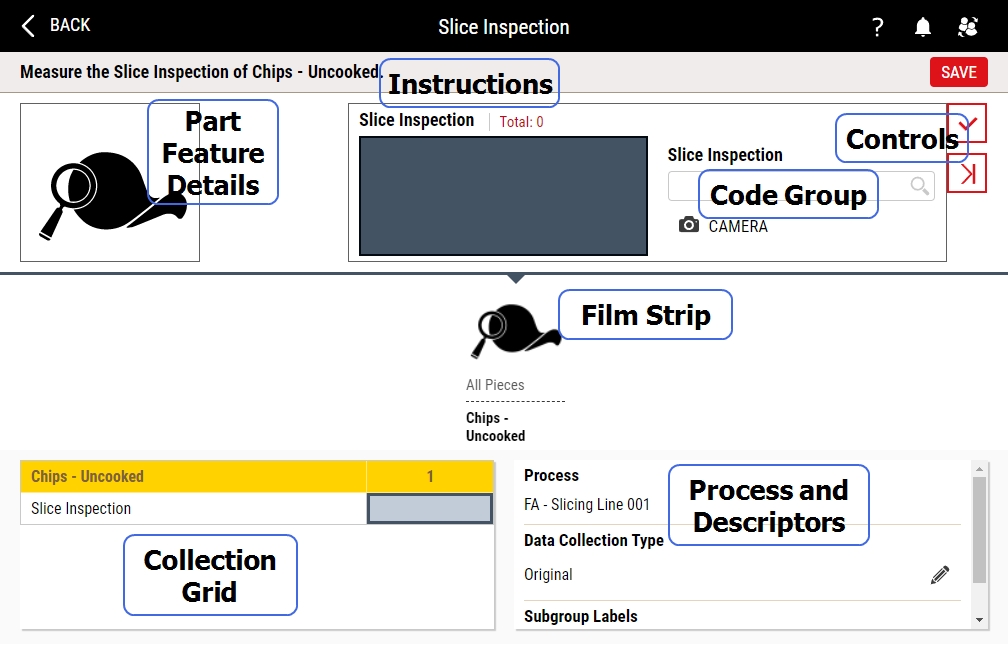
Examine the attribute data collection page.
-
Instructions. Enact displays the instructions from the Description data field of the Part Feature Details. For more information about the Part Feature Details, please see Creating Part Feature Details.
If there are no instructions in the Description data field of the Part Feature Details, Enact displays the instructions from the Long Name data field of the Feature.
If there are no instructions in the Description data field of the Part Feature Details or the Long Name data field of the Feature, Enact displays the following default message: "Measure the [Feature Name] of [Part Name]."
-
Current Part Feature Details. Enact displays the Part Feature Details Optional Image.
By default, Enact displays the Part Feature Details Optional Image.
- If you did not configure the Part Feature Details Optional Image, Enact displays the feature image.
- If you did not configure the feature image, Enact displays the part image.
- If you did not configure the part image, Enact displays the generic image.
-
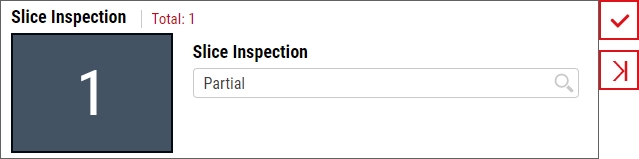
Collection Data Field. Type the count of a particular attribute. Hint
Depending on the entry rule settings for the data collection, Enact may show or hide this data field. For more information, please see Entry Rule Tab in Configuring Data Collection Parameters.
-
Code Group. Select the desired code. Hint
Depending on the entry rule settings for the data collection, Enact may show or hide this data field, or consider this field required or optional. For more information, please see Entry Rule Tab in Configuring Data Collection Parameters.
-
Controls. After typing the count in the Collection Data Field and selecting the code in the Code Group, do one of the following:
-
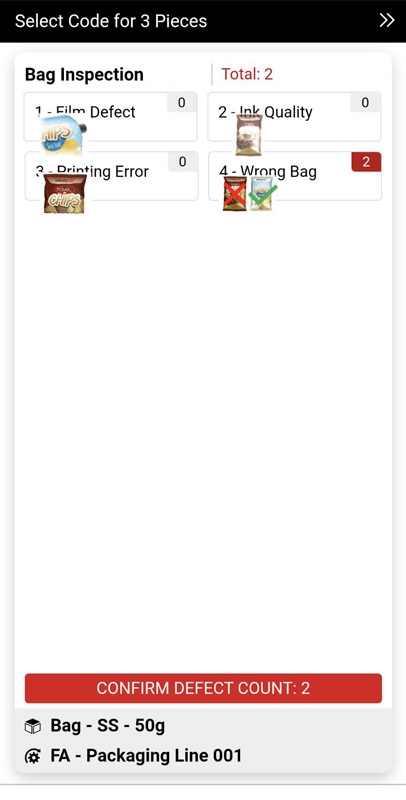
Film Strip. Enact displays a graphical timeline of the parts for which you must collect attributes. To select a previous or upcoming part, select that entry in the film strip.
-
Collection Grid. Enact displays a grid of the status of collected and expected attributes for parts in this data collection. To select a previous or upcoming part, select that entry in the collection grid.
- Process and Descriptors. Enact displays the current process and any other descriptors, including lot and data collection type.
-
-
To collect attribute data, do the following:
-
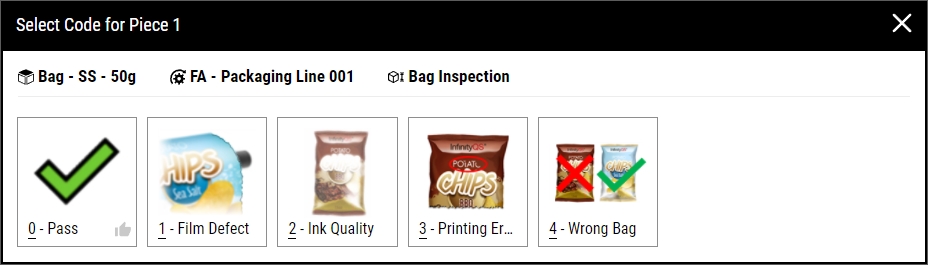
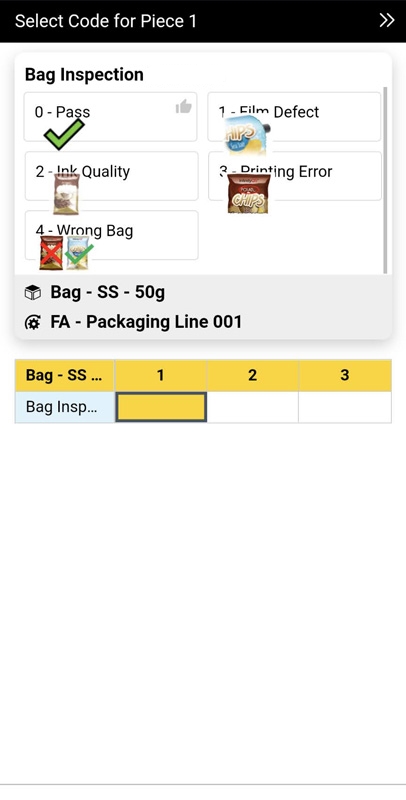
Code List (Defect & Defective)
During data collection, you type the attribute count and select the attribute code. Depending on the configuration, Enact may require that you provide both the attribute count and attribute code, attribute count only, attribute count and optional attribute code, or attribute code only. For more information, please see Entry Rule Tab in Configuring Data Collection Parameters.

- In the collection data field (if displayed), type the count of a particular attribute.
-
In the code group drop-down list (if displayed), select the desired code.
If Enact is configured to allow operators to add new codes during data collection (that is, Lock list during use for the code group is disabled), you may type a new code, which Enact stores in the subgroup and adds to the code group with a code weight set to 1. For more information, please see Creating Code Groups.
(Defective Only) If the defective count exceeds the code weight, Enact highlights the defective count on the data collection page, indicates the defective violation in the film strip and collection grid, and displays a confirmation prompt about the defective.
(Defective Only) If the defective count exceeds the code weight, Enact highlights the defective count on the data collection page, indicates the defective violation in the collection grid, and displays a confirmation prompt about the defective.
-
To add another count and attribute code, select Next.
To finish the attribute collection, select Done.
-
To view a list of attributes for the current part, do the following:
-
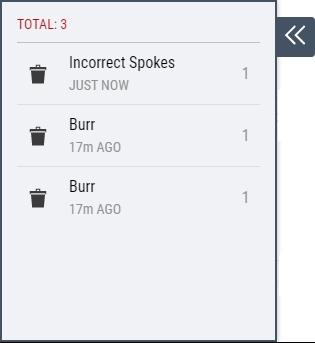
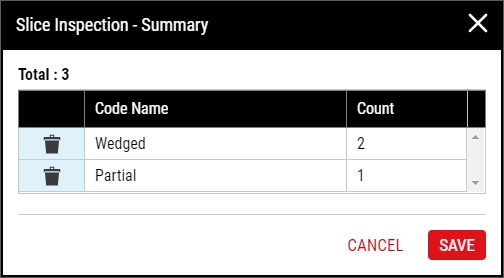
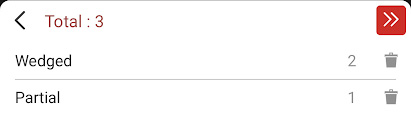
On top of the collection data field, select Total : #.
-
In the Summary dialog box, examine the list of attributes for the current part.
To modify an existing attribute set, select the current code name and type the new code, and then select the count and type the new count.
To remove an existing attribute set, select Delete for the desired attribute set.
- Select Save.
-
-
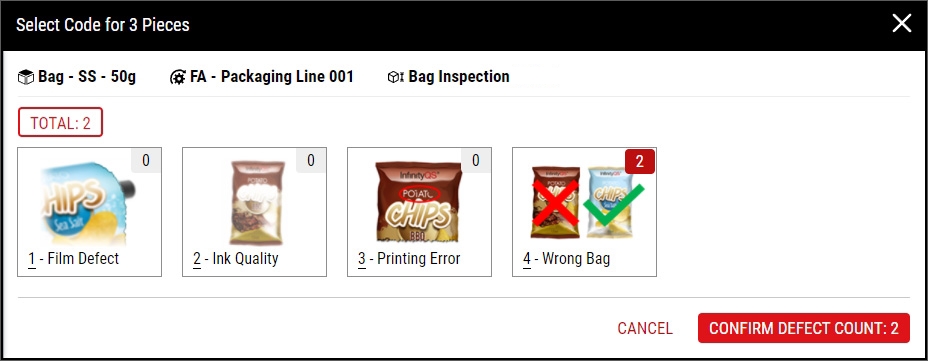
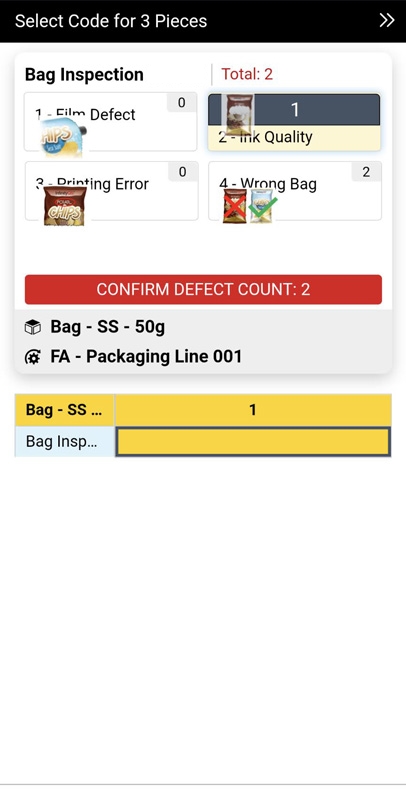
Code Grid: Increment (Defect Only)
During data collection, you set the defect count by selecting one or more times on the desired defect code button.
-
Select the desired defect code button for each defect. For example, to set two wedged defects, the operator selects the Wedged defect button twice.
If Enact is configured to allow operators to add new codes during data collection (that is, Lock list during use for the code group is disabled), you may select Code, type the new code, and then select Add & Select. Enact adds and increments the new code, and also adds the new code to the code group with a code weight set to 1. For more information, please see Creating Code Groups.
To close the defect count dialog box without making a selection, select Cancel or the X in the upper right hand corner
-
To view a list of defects for the current part, do the following:
-
When finished, select Confirm Defect Count.
If you close the Select Code dialog box and need to reopen it, select the code grid icon in the Collection Data Field.
- Select Save.
-
-
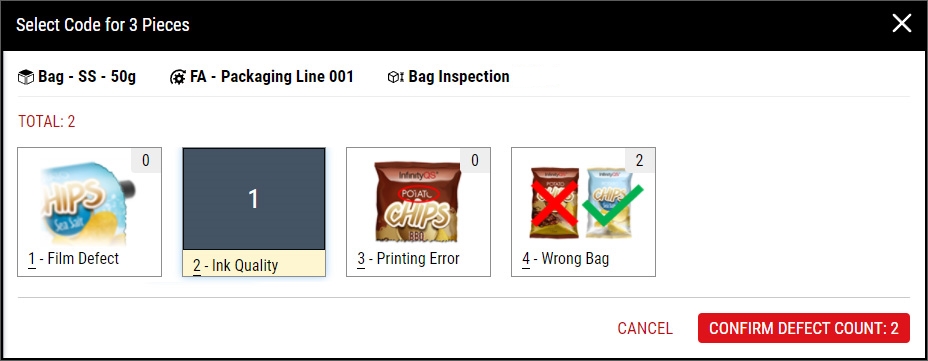
Code Grid: Numeric (Defect Only)
During data collection, you set the defect count by selecting the desired defect code button and typing the defect count.
-
In the Select Code dialog box, select the desired defect code button for each defect and type the defect count. For example, to set two wedged defects, select the Wedged defect button and then type 2.
If Enact is configured to allow operators to add new codes during data collection (that is, Lock list during use for the code group is disabled), you may select Code, type the new code, select Add & Select, and then type the defect count. Enact adds the new code to the code group with a code weight set to 1. For more information, please see Creating Code Groups.
To close the defect count dialog box without making a selection, select Cancel or the X in the upper right hand corner
-
When finished, select Confirm Defect Count.
If you close the Select Code dialog box and need to reopen it, select the part image in the Film Strip.
-
To view a list of defects for the current part, do the following:
-
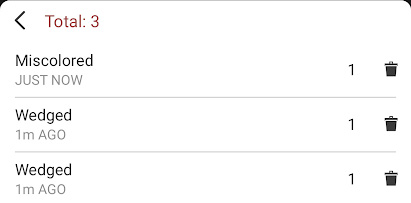
Select Total : #.
-
In the Summary dialog box, examine the list of attributes for the current part.
To modify an existing attribute set, select the current code name and type the new code, and then select the count and type the new count.
To remove an existing attribute set, select Delete for the desired attribute set.
-
Select Save.
-
- Select Save.
-
-
Require a Code for Each Piece (Defective Only)
During data collection, the operator must select one defective code button for every piece in the subgroup, and cannot skip the defective code selection. Most customers will use this data collection for Pass/Fail or Approve/Reject checks.
-
Select one defective code button for each piece in the subgroup. For example, if the subgroup contains three pieces, select Pass for the first piece, select Pass for the second piece, and select Misprint for the third piece.
If Enact is configured to allow operators to add new codes during data collection (that is, Lock list during use for the code group is disabled), you may select Code, type the new code, and then select Add & Select. Enact adds the new code to the code group with a code weight set to 1. For more information, please see Creating Code Groups.
If the defective count exceeds the code weight, Enact highlights the defective count on the data collection page, indicates the defective violation in the film strip and collection grid, and displays a confirmation prompt about the defective.
To close the defective selection dialog box without making a selection, select Cancel or the X in the upper right hand corner
- Select Save.
-
-
-
To modify the selected descriptors, do the following:
-
Locate the Descriptors section.
Where are my descriptors?To view your descriptors, select Expand.
-
In the desired descriptor, select Edit.
Enact does not allow you to modify the process or part.
-
- Repeat the above steps for all attributes in every part.
-
-
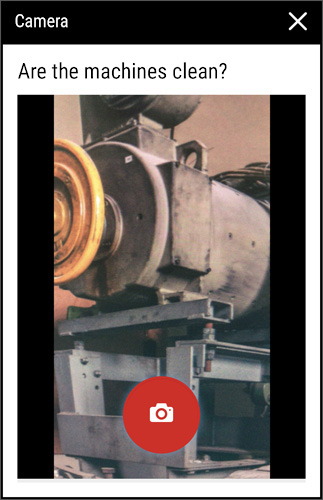
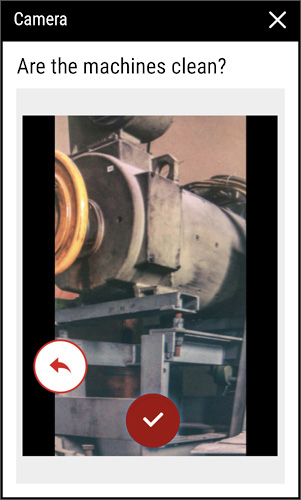
Using your device's camera through the browser running Enact, you can capture a photo and assign that image to the subgroup, as follows:
Supported Browsers-
Google Chrome
- Windows/Android. Camera access supported.
- iOS. Camera access NOT supported.
-
Microsoft Edge
- Windows/Android. Camera access supported.
- iOS. Camera access NOT supported.
-
Apple Safari
- Windows/Android. Camera access NOT supported.
- iOS. Camera access supported.
-
During data collection, do one of the following:
-
To capture a new photo, select Camera.
If you don't see Camera for the checklist question, you must configure the data collection to enable Camera. For more information, please see Entry Rule Tab in Configuring Data Collection Parameters.
If Camera is grayed out and inactive, your camera is disconnected from your device or inaccessible from your browser.
- To modify an existing photo, select the photo, and then select Retake.
-
-
Aim your device's camera at the desired subject and then select the Camera button.
-
To confirm the photo, select Done.
To retake the photo, select Retake.
-
To view an existing photo, select More and then select View Image.
To view an existing photo, select the photo and then select View Image.
In the enlarged photo, you can zoom as follows:
- On a device with an attached keyboard, select the image and then press + (plus) to zoom in and press - (minus) to zoom out.
- On a device that supports pinch-to-zoom, pinch out to zoom in and pinch in to zoom out.
-
-
Select Save.
Alternatively, when you collect the last value and press ENTER, you may press ENTER again to automatically select Save.
(Variable Data Collection Only) If you enabled Review before saving in the data collection settings, select Review, and then do the following:
-
Examine the subgroup values.
-
To modify a subgroup value, select Edit, select the desired subgroup value in the Film Strip or the Collection Grid, and then edit the subgroup value in the collection data field.
-
For calculated values, you can do the following:
-
Using the procedure above, modify the calculation input values.
-
To view the steps of the calculation used to generate the calculated values, select fx in the Data Table.
-
-
Select Save.
For more information, please see Required Information Tab in Configuring Data Collection Settings.
-