Creating Production Assignments
Using this procedure, you will create the production assignment.
- Select Access Menu and then select Process | Production Assignments.
-
In the Production Assignments landing page, select Create Production Assignment.
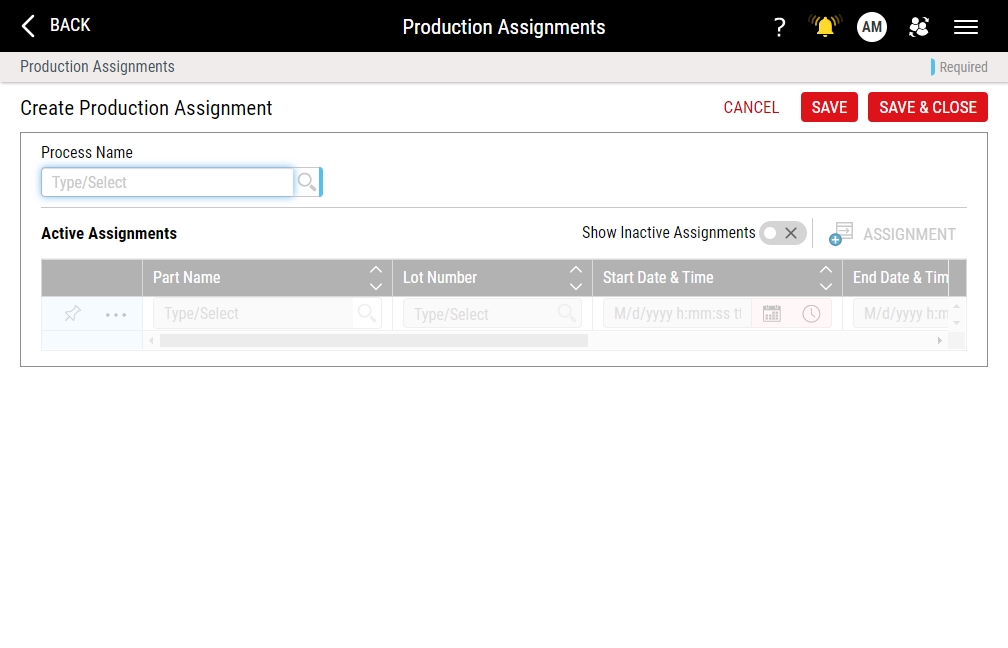
- In the Process drop-down list, select the desired process. Hint

-
To handle displaying inactive assignments, which are either scheduled for the future (Start Date & Time) or have expired in the past (End Date & Time), do the following:
- To show inactive assignments, activate the Show Inactive Assignments slider.
- To hide inactive assignments, deactivate the Show Inactive Assignments slider.
-
To add a new assignment, do the following:
- Select Assignment.
- In the Part Name drop-down list, select the desired part. Hint
-
In the Lot Number data field, select the desired lot. Hint
Enact will only allow you to view and select lots with Lot Testing set to Released. If the selected lot does not have Lot Testing set to Released, the production assignment is inactive.
-
To set the assignment Start Date & Time and End Date & Time, do the following:
You must set the assignment Start Date & Time, though the End Date & Time is optional.
The date/time combinations reflect the process’s local time and not the user’s system time.
-
To handle pinned production assignments, do the following:
What is pinning?
When production assignments overlap because the parts or lots have been scheduled for the same time, you can pin an active production assignment from the list of current production assignments. Enact treats the pinned production assignment as the only production assignment for that process. Data collections ignore all other assignments while the pin is active, which means manual data collections will bypass the part. At the same time, lot selection dialog boxes and automated data collections can upload data without requiring a specified part and lot.
Pinning also enables users to assign dashboards to other users, which enables them to have relevant information readily available rather than having to search through all dashboards for the correct one.
-
To view information on production assignments, examine the following columns:
-
Scheduled Duration. For inactive assignments, view the elapsed time between Start Date & Time and End Date & Time.
-
Pinned Duration. View the elapsed time between the time the production assignment was pinned and the current time. For more information, select the pinned duration entry.
-
-
To remove an existing assignment, do the following:
- Select Save, or select Save & Close to save and close the page.


