Creating Part Feature Details
Using this procedure, you will create the part feature details entry.
- Select Access Menu and then select Part | Part Feature Details.
-
In the Part Feature Details landing page, select Create Part Feature Details.

-
Modify the contents under the following tabs:
-
 Part Feature Details Information Tab
Under the Part Feature Details Information tab, you can assign images and descriptions to specific part-feature combinations. During data collection, Enact displays the uploaded images and description, which can provide further instructions for the operator, at the top of the data collection screen. You can also associate tags with the part feature.
-
In the Feature Name drop-down list, select the desired feature. Hint
If the selected feature has an associated image, Enact automatically displays that image in Feature Image.
-
In the Part Name drop-down list, select the desired part. Hint
If the selected part has an associated image, Enact automatically displays that part in Part Image.
-
To configure the part feature details entry image, locate the optional image item, and then do one of the following:
- To upload an image when no image currently exists, select More, select Upload Image, and then browse to the new image (maximum image size 600 KB; file types JPG, GIF, PNG, BMP).
- To change an existing image, select More, select Change Image, and then browse to the new image (maximum image size 600 KB).
- To remove an existing image, select More and then select Remove Image.
InfinityQS recommends resizing images to an aspect ratio of 4:3 (for example, 160 pixels wide by 120 pixels tall).
-
In the Description data field, type the extended name of the part feature details entry.
Enact displays the Description data field in the information bar at the top of data collection pages for this part-feature combination.
If you type a URL in the data field, Enact automatically converts the URL to a selectable link that opens the destination (work instruction, website, image, etc.) in a new tab.
-
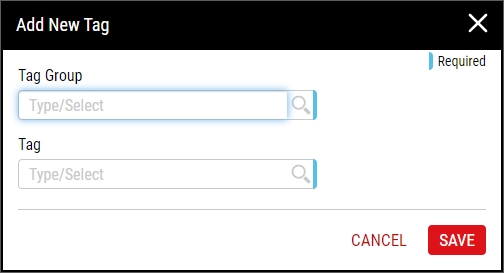
Using tags, you can provide additional characteristics to further identify the part feature details entry. To add tags to the part feature details entry, do the following:
-
-
Miscellaneous Limits Tab
Under the Miscellaneous Limits tab, you can set the miscellaneous limits, including Cp Target, Cpk Target, Pp Target, Ppk Target, and Defects per Opportunity, allowing you to apply the Six Sigma quality method of process performances and defect opportunities and enable better process performance.
- Deselect Use Defaults.
-
Under the Miscellaneous Limits tab, type the following values:
- Cp Target. (Set between 0.01 to 9.99) Company standard or desired ratio of the process variability (six sigma, short-term estimate) to the width of the specification limits (total tolerance). This ratio is used to calculate Economic Limits where actual process output performance is compared to the Cp Target.
- Cpk Target. (Set between 0.01 to 9.99) Company standard or desired ratio of the process variability (three sigma, short-term estimate of sigma) to the width of the specification limit closest to the process mean.
- Pp Target. (Set between 0.01 to 9.99) Company standard or desired ratio of the process variability (six sigma, long-term estimate of sigma) with the width of the specification limits (total tolerance).
- Ppk Target. (Set between 0.01 to 9.99) Company standard or desired ratio of the process variability (three sigma, long-term estimate of sigma) to the width of the specification limit closest to the process mean.
- Defects per Opportunity. (Applicable only for features with defect feature type) Ratio of defects found on a unit divided by the total number of possible defects that could have occurred on that unit. For example, if 7 bad solder joints were found on a board with 800 solder joints, the Defects per Opportunity = 7/800, which is 0.00875.
-
- Select Save, or select Save & Close to save and close the page.