Configuring Data Collection Settings
Using this procedure, you will configure settings for a data collection.
- Select Access Menu and then select Data Collection | Data Collection Configurations.
-
Select the Configure Parameters cogwheel for the data collection.
-
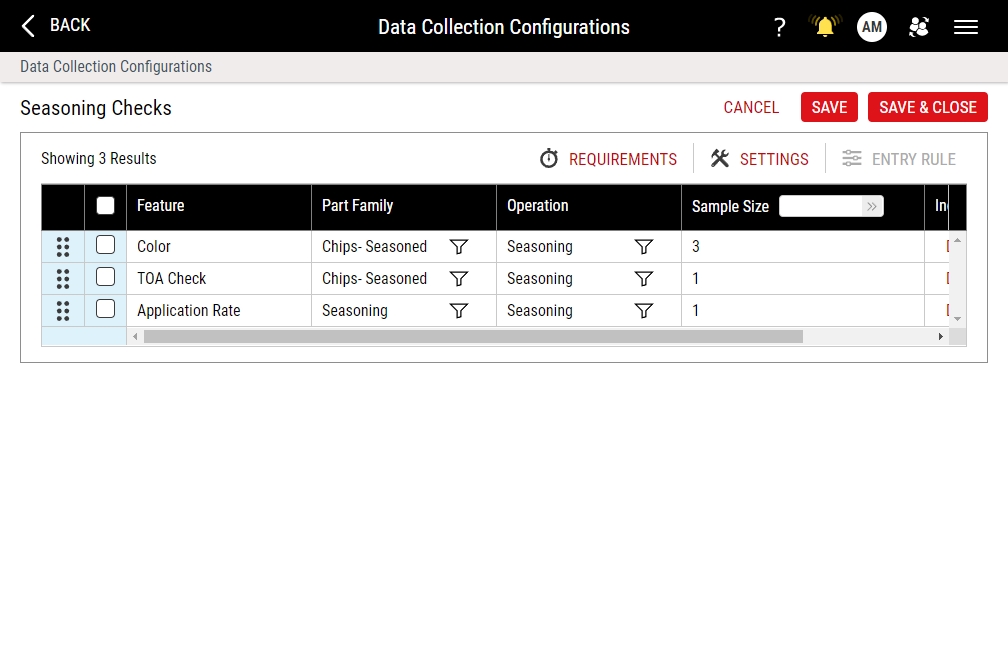
On the data collection's detail page, select Settings in the top right.
-
Modify the contents under the following tabs:
-
 Sequence Rule Tab
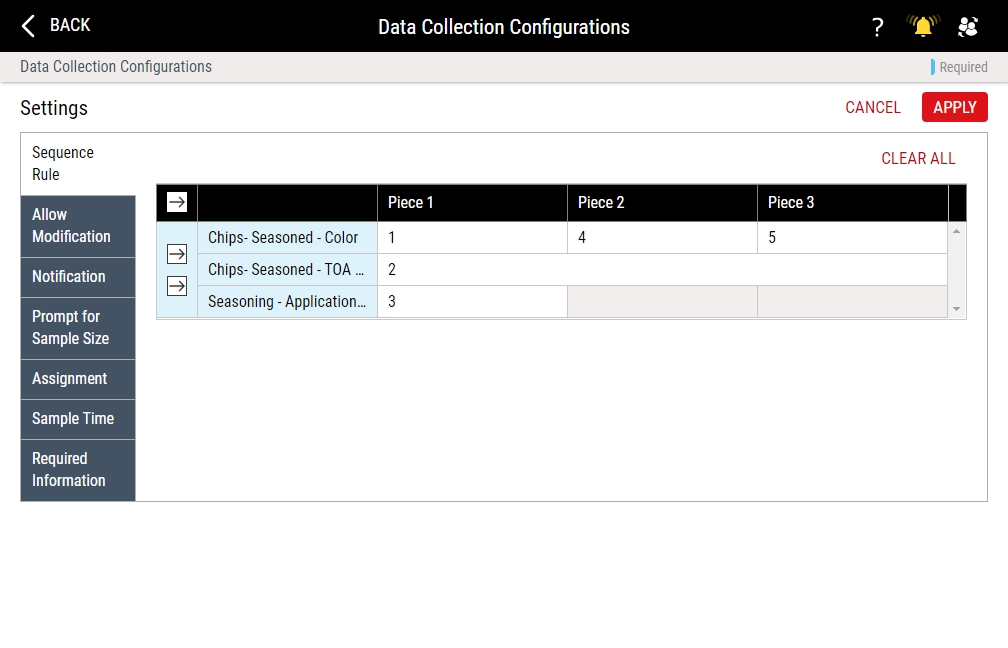
By default, Enact collects data for the first piece for each feature, and then collects data for the second piece for each feature, and then collects data for the third piece for each feature, and so on.
Under the Sequence Rule tab, you can configure the sequence of data collection for each feature, changing the order of which piece to collect in the sequence.
-
To collect all pieces for each feature first (that is, collect data for the first piece, then the second piece, then the third piece, and so on, for each feature prior to starting data collection on the next feature), select Sequence in the column header.
-
To collect all pieces for a specific feature first, select Sequence in the feature row.
- To deselect a sequence column or row, select Sequence again.
-
-
 Allow Modification Tab
Under the Allow Modification tab, you can allow operators to manually modify the collected values that are entered by keyboard or through the gauge device. During data collection, operators may need to edit a value entered by the keyboard or the gauge.
- To allow operators to manually edit typed values during data collection, select Edit keyboard entered values during data entry.
- To allow operators to manually edit gauge values during data collection, select Edit gauge entered values during data entry.
-
 Notification Tab
Under the Notification tab, you can configure the data collection interface, highlighting values that are out of specification or out of warning with symbols and playing sounds upon entering values from a gauge.
- To display the USL/TAR/LSL scale beside the data collection data field and the Defective counter label, select Violation Highlight (Scale or Defective Label).
- To display Out of Specification (circle), defective violation (circle), or Out of Warning (triangle) symbols in the data collection grid, select Grid Highlight.
- To display warning prompts to the operation for Out of Specification, Out of Warning, Unreasonable Values, or defective violations, select Violation Popup.
- To play a sound upon entering a gauge value, select the Play sound when a gauge value is entered checkbox.
-
 Prompt for Sample Size Tab
Under the Prompt for Sample Size tab, you can set Enact to prompt for sample size at the start of the data collection or upon saving the collected data.
- To prompt for sample size at the beginning of data collection, select On Start.
- (Attribute Features Only) To prompt for sample size upon saving the collected data, select On Save.
-
 Assignment Tab
Under the Assignment tab, you can restrict use of the data collection to certain users, roles and workstation. For example, you can restrict a specific data collection to a specific workstation on the shop floor.
Enact automatically updates data collection assignments every 10 minutes, which means there will be a slight delay before you see recent changes.
- Select Allow only the following to perform the data collection.
- Select Assignee.
- In the Assignee drop-down list, select the desired assignee type.
- In the Name drop-down list, select the desired user, role, or workstation.
- To add additional users, roles, or workstations, repeat the above steps.
To remove an existing assignee entry, select Delete.
-
 Sample Time Tab
Under the Sample Time tab, you can configure Enact to record the sample time for a data collection for each subgroup, based on when the data collection begins, when the operator saves the data, or the time manually entered by the operator.
-
To automatically set the data collection time for each subgroup, select System Entered Sample Time, and then do the following:
- To use the time when data collection began, select On Start.
- To use the time when the operator saves the data, select On Save.
- To prompt the operator for the data collection time for each subgroup, select User Entered Sample Time.
-
-
 Required Information Tab
Under the Required Information tab, you can require that lot genealogy be verified when the data collection is launched. You can also add a requirement to the data collection, including requiring operators to collect data for lots or collect data for each subprocess or trigger a data collection with just failed features, maintaining the same sample size and requirement window (if any), without the need to configure new data collections.
-
To require lot genealogy be verified when the data collection is launched, check the Verify Lot Genealogy checkbox in the upper right.
-
To manage lots in the data collection, do the following:
- In the Lots section, select each desired output part family that will allow lot assignment.
- To allow operators to create new lots by typing a lot name that doesn't exist, select Allow lot creation.
-
To allow operators to select data collection types, do the following:
- In the Others section, select Data Collection Type.
- To prompt operators to select from all data collection types, select Prompt.
- To prompt operators to select from a subset of data collection types, select Prompt (Limited), and in the drop-down list, select each data collection type that operators can select.
- To automatically select one data collection type for operators, select No Prompt, and in the drop-down list, select one data collection type.
-
To allow operators to select subgroup labels, do the following:
- In the Others section, select Subgroup Label Group.
-
In the Subgroup Label Group drop-down list, select the desired subgroup label group.
You can add up to a maximum of 5 data collection types.
- To reorder the existing subgroup label groups (when more than one exists), select and drag Reorder.
-
To configure the subgroup label group, do the following:
-
In the desired subgroup label group, select Configure.
-
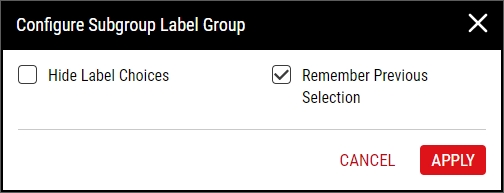
To hide the subgroup label group buttons that operators select during data collection, select to check Hide Label Choices.
To enable auto-completion suggestions of subgroup label groups for operators typing in the search box during data collection, select to check Utilize label "Auto-Complete".
- To highlight the subgroup label group button previously chosen by the operator during data collection, select to check Remember Previous Selection.
- Select Apply.
-
-
If you select Contains Subprocesses for the process, the operator must collect data for each subprocess.
For more information about creating processes, please see Creating Processes.
To manage subprocesses during data collection, do the following:
- To ignore subprocesses and only collect data for the selected process, select Ignore Subprocesses.
- To provide the operator with a subprocess checklist, allowing the operator to select the desired subprocesses, select Prompt for Subprocesses.
-
To display subprocess identifiers along with feature names in data collection, check the Display Subprocess and Feature Name checkbox.
-
To enable calculation value reviewing, locate the Review section, and then select Review before saving.
 More Info
Once enabled, the data collection operator will be able to view the calculated values and steps of the calculation used to generate those values. Upon identifying an issue, the operator can modify calculation input values prior to saving the subgroup with calculated output values.
- To trigger a data collection with just failed features, do the following:
- On the Follow-up Collection (Variable Features) section, select Trigger follow-up Data Collection for features with Manufacturing Limit Violation. This triggers a data collection with just failed features, maintaining the same sample size and requirement window, if any. Follow-up collections will be valid for one hour if no time limit exists.
If data collected has Manufacturing Limits violations, then those violations generate a follow-up data collection as per sampling requirements. All Manufacturing Limit violations per feature will be grouped together.
If the collected data contains Manufacturing Limit violations for multiple variable features, a follow-up collection will be triggered for each feature with a violation.
If there are multiple data collections with the same Part-Process Feature (PPF), satisfying one requirement will satisfy all requirements with the same PPF.
-
-
- Select Apply.
- Select Save, or select Save & Close to save and close the page.


