Descriptors (Packaging)
Parts
- Select Access Menu and then select Part | Parts.
-
To add the Bag - BBQ - 50g part, select Create Part and then do the following:
- Short Name: Bag - BBQ - 50g
-
Image: BagBBQ50g.png
 How do I select the image?
In the Image section, select More, select Upload Image, browse to the desired image and then select Open.
Select Save & Close.
-
To add the Bag - BBQ - 300g part, select Create Part and then do the following:
- Short Name: Bag - BBQ - 300g
-
Image: BagBBQ300g.png
How do I select the image?
In the Image section, select More, select Upload Image, browse to the desired image and then select Open.
Select Save & Close.
-
To add the Bag - SS - 50g part, select Create Part and then do the following:
- Short Name: Bag - SS - 50g
-
Image: BagSS50g.png
How do I select the image?
In the Image section, select More, select Upload Image, browse to the desired image and then select Open.
Select Save & Close.
-
To add the Bag - SS - 300g part, select Create Part and then do the following:
- Short Name: Bag - SS - 300g
-
Image: BagSS300g.png
How do I select the image?
In the Image section, select More, select Upload Image, browse to the desired image and then select Open.
Select Save & Close.
-
To add the Crisps - BBQ - 50g part, select Create Part and then do the following:
- Short Name: Crisps - BBQ - 50g
-
Image: CrispsBBQ50g.png
How do I select the image?
In the Image section, select More, select Upload Image, browse to the desired image and then select Open.
Select Save & Close.
-
To add the Crisps - BBQ - 300g part, select Create Part and then do the following:
- Short Name: Crisps - BBQ - 300g
-
Image: CrispsBBQ300g.png
How do I select the image?
In the Image section, select More, select Upload Image, browse to the desired image and then select Open.
Select Save & Close.
-
To add the Crisps - SS - 50g part, select Create Part and then do the following:
- Short Name: Crisps - SS - 50g
-
Image: CrispsSS50g.png
How do I select the image?
In the Image section, select More, select Upload Image, browse to the desired image and then select Open.
Select Save & Close.
-
To add the Crisps - SS - 300g part, select Create Part and then do the following:
- Short Name: Crisps - SS - 300g
-
Image: CrispsSS300g.png
How do I select the image?
In the Image section, select More, select Upload Image, browse to the desired image and then select Open.
Select Save & Close.


Processes
This Getting Started tutorial assumes an existing hierarchy design, which you may not have, and may not want, in your Enact system. The default Enact hierarchy looks like this:

This tutorial expects the following hierarchies:

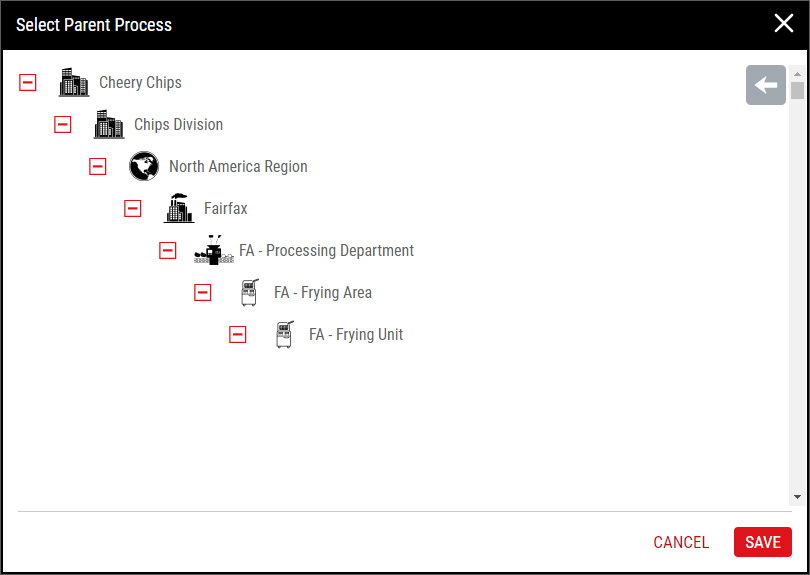
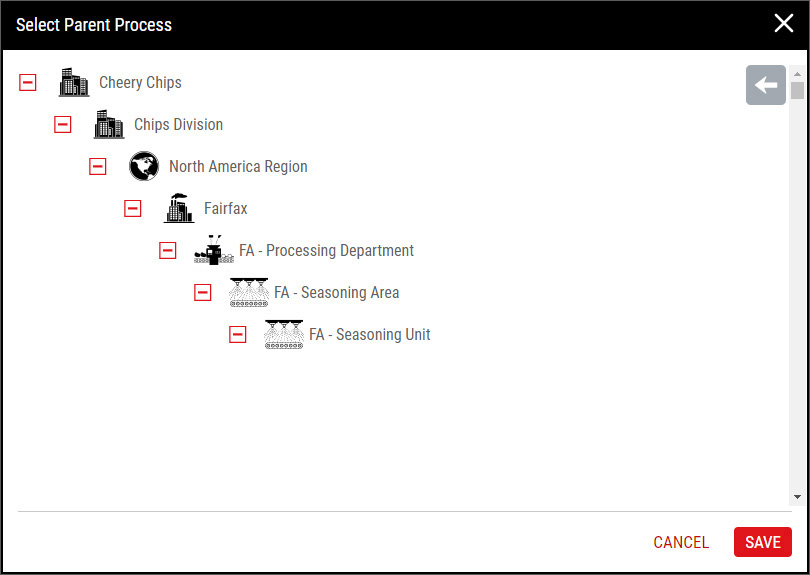
To match the expected hierarchy, please add the following:
- Slicing. Cheery Crisps > Crisps Division > North America Region > Fairfax > FA - Processing Department > FA - Slicing Area > FA - Slicing Unit
- Frying. Cheery Crisps > Crisps Division > North America Region > Fairfax > FA - Processing Department > FA - Frying Area > FA - Frying Unit
- Seasoning. Cheery Crisps > Crisps Division > North America Region > Fairfax > FA - Processing Department > FA - Seasoning Area > FA - Seasoning Unit
- Packaging. Cheery Crisps > Crisps Division > North America Region > Fairfax > FA - Packaging Department > FA - Packaging Area > FA - Packaging Unit
For more information, please see Creating Processes.
- Select Access Menu and then select Process | Processes.
-
To add the FA - Packaging Line 004 process, select Create Process and then do the following:
- Short Name: FA - Packaging Line 004
-
Image: FAPackagingLine004.png
How do I select the image?
In the Image section, select More, select Upload Image, browse to the desired image and then select Open.
-
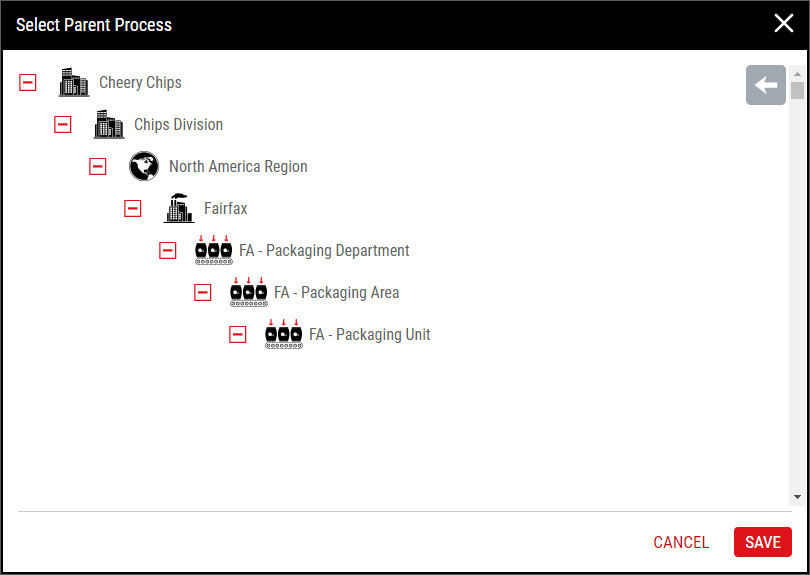
Parent Process: FA - Packaging Unit
How do I select the parent process?
Select Parent Process, select the desired parent process and then select Save.
Select Save & Close.

My Processes
- Select User Settings and then select My Processes.
- In the My Processes dialog box, select FA - Packaging Line 004 and then select Save.

Response Groups
- Select Access Menu and then select Feature | Response Groups.
-
To add the Acceptable/Unacceptable response group, select Create Response Group and then do the following:
- In the Response Group data field, type Acceptable/Unacceptable.
-
To add each response, select Choice (if necessary) and then type the following:
Select Save.
-
To add the Packaging Line response group, select Create Response Group and then do the following:
- In the Response Group data field, type Packaging Line.
- In the Response Type drop-down list, select 2 - Multiple Answer.
-
To add each response, select Choice (if necessary) and then type the following:
Select Save.


Features
- Select Access Menu and then select Feature | Features.
-
To add the Tear Strength feature, select Create Feature and then do the following:
- Short Name: Tear Strength
-
Image: TearStrength.png
How do I select the image?
In the Image section, select More, select Upload Image, browse to the desired image and then select Open.
- Type: 1 - Variable
Select Save.
-
To add the Gross Weight feature, select Create Feature and then do the following:
- Short Name: Gross Weight
-
Image: GrossWeight.png
How do I select the image?
In the Image section, select More, select Upload Image, browse to the desired image and then select Open.
- Long Name: 1. Tare scale 2. Place product on scale 3. Press 'PRINT' on scale to send results
- Type: 1 - Variable
Select Save.
-
To add the Net Weight feature, select Create Feature and then do the following:
- Short Name: Net Weight
-
Image: NetWeight.png
How do I select the image?
In the Image section, select More, select Upload Image, browse to the desired image and then select Open.
- Type: 1 - Variable
Select Save.
-
To add the Nitrogen Pressure feature, select Create Feature and then do the following:
- Short Name: Nitrogen Pressure
-
Image: NitrogenPressure.png
How do I select the image?
In the Image section, select More, select Upload Image, browse to the desired image and then select Open.
- Type: 1 - Variable
Select Save.
-
To add the Tare Weight feature, select Create Feature and then do the following:
- Short Name: Tare Weight
-
Image: TareWeight.png
How do I select the image?
In the Image section, select More, select Upload Image, browse to the desired image and then select Open.
- Type: 1 - Variable
Select Save.
-
To add the Tare Weight - Avg feature, select Create Feature and then do the following:
- Short Name: Tare Weight - Avg
-
Image: TareWeightAvg.png
How do I select the image?
In the Image section, select More, select Upload Image, browse to the desired image and then select Open.
- Type: 1 - Variable
Select Save.
-
To add the Label Check feature, select Create Feature and then do the following:
- Short Name: Label Check
-
Image: LabelCheck.png
How do I select the image?
In the Image section, select More, select Upload Image, browse to the desired image and then select Open.
- Type: 3 - Defective
-
Code Group: Pass or Fail
How do I select the code group?
In the Code Group drop-down list, select the desired code group. Hint
Select Save.
-
To add the PRE-OP - ALL - 01 feature, select Create Feature and then do the following:
- Short Name: PRE-OP - ALL - 01
- Long Name: Has all previous product been cleared from the line?
-
Image: Checklist01.png
How do I select the image?
In the Image section, select More, select Upload Image, browse to the desired image and then select Open.
- Type: 4 - Checklist
-
Response Group: Acceptable/Unacceptable
How do I select the response group?
In the Response Group drop-down list, select the desired response group. Hint
Select Save.
-
To add the PRE-OP - ALL - 02 feature, select Create Feature and then do the following:
- Short Name: PRE-OP - ALL - 02
- Long Name: Based on allergens, have the appropriate dry/wet cleans been performed?
-
Image: Checklist02.png
How do I select the image?
In the Image section, select More, select Upload Image, browse to the desired image and then select Open.
- Type: 4 - Checklist
-
Response Group: Acceptable/Unacceptable
How do I select the response group?
In the Response Group drop-down list, select the desired response group. Hint
Select Save.
-
To add the PRE-OP - ALL - 03 feature, select Create Feature and then do the following:
- Short Name: PRE-OP - ALL - 03
- Long Name: Have all safety guards been replaced?
-
Image: Checklist03.png
How do I select the image?
In the Image section, select More, select Upload Image, browse to the desired image and then select Open.
- Type: 4 - Checklist
-
Response Group: Acceptable/Unacceptable
How do I select the response group?
In the Response Group drop-down list, select the desired response group. Hint
Select Save.
-
To add the PRE-OP - ALL - 04 feature, select Create Feature and then do the following:
- Short Name: PRE-OP - ALL - 04
- Long Name: Are you wearing all necessary personal protection equipment (PPE)?
-
Image: Checklist04.png
How do I select the image?
In the Image section, select More, select Upload Image, browse to the desired image and then select Open.
- Type: 4 - Checklist
-
Response Group: Acceptable/Unacceptable
How do I select the response group?
In the Response Group drop-down list, select the desired response group. Hint
Select Save.
-
To add the PRE-OP - PKG - 01 feature, select Create Feature and then do the following:
- Short Name: PRE-OP - PKG - 01
- Long Name: What areas are unsatisfactory? (select all that apply)
-
Image: ChecklistPKG.png
How do I select the image?
In the Image section, select More, select Upload Image, browse to the desired image and then select Open.
- Type: 4 - Checklist
-
Response Group: Packaging Line
How do I select the response group?
In the Response Group drop-down list, select the desired response group. Hint
Select Save.

Next Step: Specification Limits (Packaging)