Adding an Access Token
Successfully configuring an access token requires a good understanding of the credentialing requirements of your host service provider. This information is often published in their API reference documents.
The image below depicts the Authorization tab of the Access Authorization dialog.
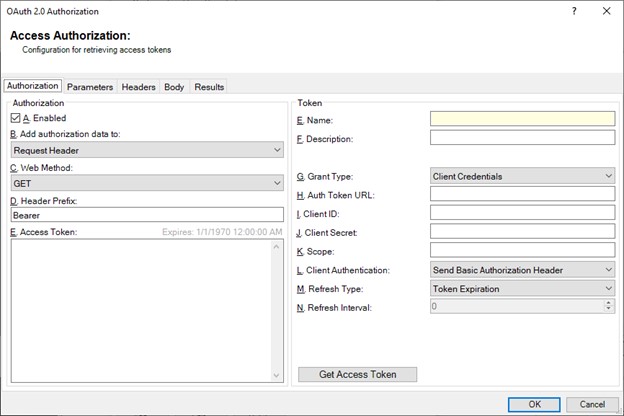
Provide the following information here to add an access token:
-
Add authorization data to: Determines if the access tokens are to be added to the request header (common), or as part of the ULR parameters (less common). This is host specific and modifies how the Json Provider submits the access-token to the host during subsequent requests. This applies to the Provider consumer of the access token.
-
Web Method: Specifies if the access-token request is to be retrieved using a GET, PUT or POST request. This applies to authentication / token retrieval.
-
Header Prefix: Indicates what access token prefix is sent by the Json Provider in subsequent requests. This is host specific and may be modified by the data returned with the access token once it is retrieved. This is usually “bearer” or “Bearer”. This applies to the Provider consumer of the access token.
-
Name and Description: Free-form and appears in the drop-down list allowing a Provider consumer to select an appropriate managed access token for its requests.
-
Auth Token URL: URL of the host responsible for handling the OAuth2.0 authentication access token retrieval for the service you are communicating with. This will be supplied by the host services API documentation. This only applies to authentication / token retrieval.
-
Grant Type: Specifies if the access-token is retrieved via Username and Password, or Client-Id and Secret. This only applies to authentication / token retrieval.
-
Scope: Varies between host providers. Some require no scope, while others may require specific text. Scope fields are usually separated by spaces when multiple scopes exist. Scope is used by the host system to limit the type of information that is available. This should be found in the host API documentation if required. This only applies to authentication / token retrieval.
-
Client Authentication: Determines if the login information is included in the request header or in the body of the request. This is host specific and should be provided by the host API documentation. This only applies to authentication / token retrieval.
-
Refresh Type: There are 5 token refresh options available and are specific to DMS only. This only applies to how the Token Manager keeps the access tokens current, and are as follows:
-
Each Request: Specifies that a new access-token is to be retrieved every time a request is made by your Json Provider.
-
Token Expiration: Some tokens are valid for a period of time, after which they expire. If the host supplied an expiration period, the token will be refreshed by DMS 1-2 minutes prior to expiration.
-
Every (n) Minutes: Specifies that the token will be refreshed every (n) minutes on a fixed time interval regardless of any token expiration data sent back from the host.
-
On Unauthorized: Specifies that the token will not be refreshed until an “Unauthorized” response is returned from the host. The token will then be refreshed and the request will be made again. This will occur up-to 5 times until the request succeeds. If it does not succeed DMS will produce an error.
-
Never: Indicates that the token is a one-time token that never expires. It can be used indefinitely until you change it manually.
-
Adding Parameters
-
Select Parameters.
-
Select Add.
The Parameter dialog box appears as depicted in the image below:
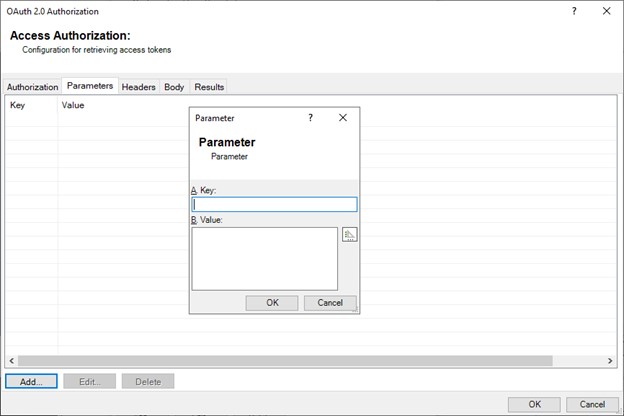
Parameters can be added to the request for a token depending on the host requirements. These are key-value pairs, typically found in the URL line after a ”?” character.
DMS Tags may be used to insert data from other DMS providers into the parameter.
This applies to authentication / retrieval.
Adding Header Information
On the Headers tab, select Add.
The Header dialog appears.

The Headers tab is similar to the Parameters tab, but the key + value pairs are sent in the request headers as opposed to URL parameters. This is host-specific and must adhere to the host API documentation.
A DMS tag may be used to substitute a value with a value from another DMS provider.
This applies to authentication / token retrieval.
Adding Body Information
On the Body tab, select Add.
The Body dialog appears.

The Body tag can contain one or more key+value pairs or a Raw Data element (like a JSON or Xml packet).
If you attempt to mix raw data and key + value pairs together, the dialog turns yellow, indicating an error condition, and the Raw Data is sent instead of the key+value pairs. DMS does not produce a warning or error for this condition.
Only use key + value pairs OR raw data, not a mix of both.
A DMS tag can be embedded into the value.
This applies to authentication / token retrieval.
Viewing Results
After an access-token is retrieved successfully, the additional contents returned appear on the Results tab.
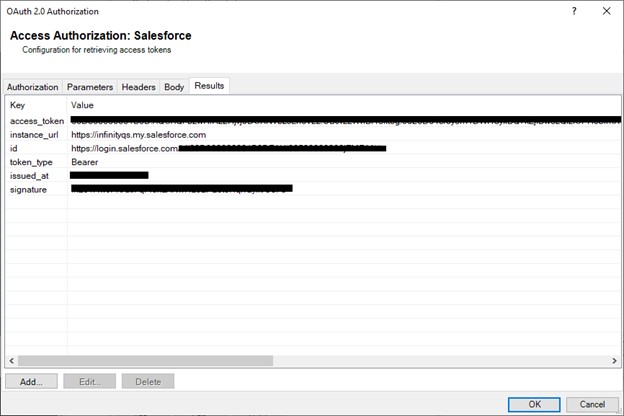
The key can be referenced the same as a DMS token: prefix the key name with “$”.
For instance, if the key id is required in a query header for your JSON provider, you could use “$id” as the header value, and it would be retrieved from these results.
This is populated during access token retrieval, and used by the consuming JSON provider.
The following key values are automatically assigned to the access token:
-
access_token
-
refresh_token
-
identity_token
-
device_token
-
token_type
-
scope
-
expires
-
expires_in
You do not need to reference these by $key in your Provider consumer.
Testing Token Retrieval
After entering all the required information listed above, select Get Access Token on the Authorization tab.
An Access Token appears.

Select Results to view more information about what is returned.
Any issues you experience must be fixed before a valid access token can be successfully retrieved.
Using Access Token Provided by Other Means
Some hosts may provide a one-time access token that is used without further authentication.
In this case, it is appropriate to paste this into the Access Token field on the Authorization tab and leave all the other fields blank.
Leaving the Auth Token URL blank bypasses any access-token retrieval. In this case, ensure that the Refresh-Type is set to Never.
Select OK to add the token to the Token Manager list. The token is now available for your JSON provider.
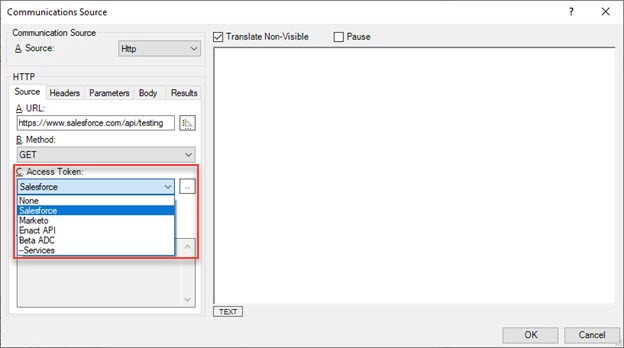
Using an Existing Access Token
Once a user-token has been retrieved, use it in your JSON provider(s) by selecting it an the Access Token on the Source tab of the Communications Source dialog.