Editing Manufacturing Limits
Using this procedure, you will edit existing manufacturing limits.
Enact automatically updates manufacturing limits every 10 minutes, which means there will be a slight delay before you see recent changes.
- Select Access Menu and then select Analysis | Manufacturing Limits.
-
In the Manufacturing Limits landing page, select Edit.
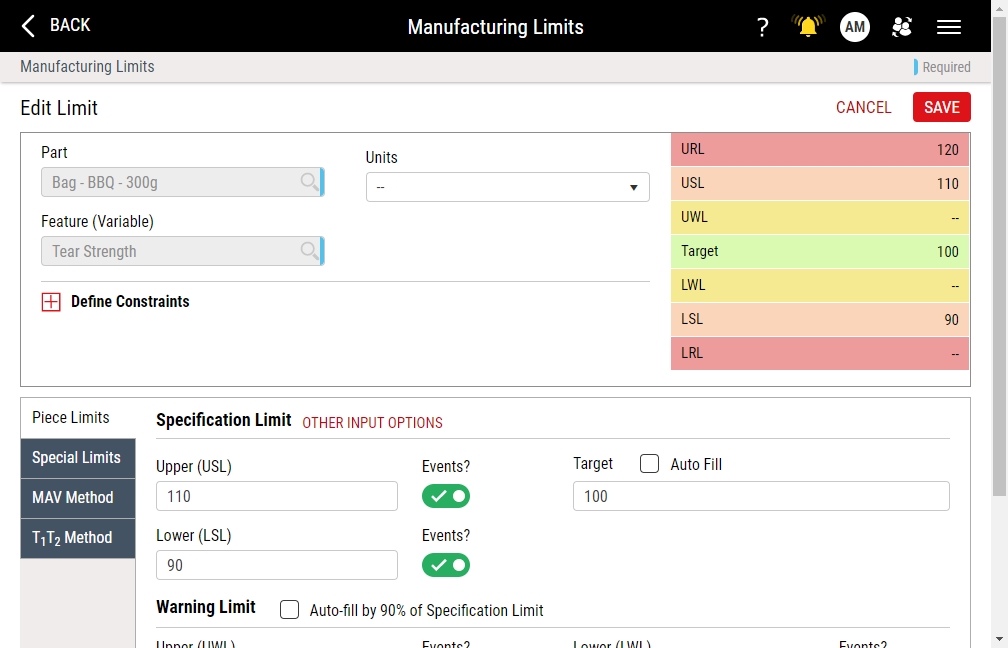
- In the Units drop-down list, select the desired measurement unit.
-
Modify the contents under the following tabs:
-
 Piece Limits Tab
Under the Piece Limits tab, you can assign and configure the specification limits (standard or alternate), warning limits, and reasonable limits for a part and feature combination.
-
Specification Limits (Standard)
Based on either external requirements (customer, engineering, or management) or on internal requirements (subsequent processes), specification limits identify the tolerances or engineering limits for a part and test combination to determine product acceptability. You must define specification limits before you can define certain statistics, such as Cpk and Ppk.
-
In the Specification Limit section, type the Upper (USL) limit value, Lower (LSL) limit value, and Target limit value.
To automatically populate the Target limit value, type the Upper (USL) limit value and the Lower (LSL) limit value, select in the Target data field, and then select the Auto Fill checkbox.
-
To enable events on a specification limit violation, activate the Events slider.
To disable events on a specification limit violation, deactivate the Events slider.
-
-
Specification Limits (Alternate)
-
In the Specification Limit section, select Other Input Options.
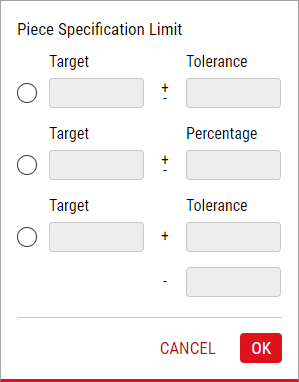
- To set the target and tolerance, select Target / Tolerance, type the Target limit value, and then type the +/- Tolerance limit value.
- To set the target and percentage, select Target / Percentage, type the Target limit value, and then type the +/- Percentage limit value.
- To set the target +/- tolerance, select Target / Tolerance (+ and -), type the Target limit value, and then type the + Tolerance limit value and the - Tolerance limit value.
- Select OK.
-
-
Warning Limits
Set within the specification limits, you can use warning limits to notify users that a measurement value is close to an upper or lower specification limit.
-
In the Warning Limit section, type the Upper (UWL) limit value and Lower (LWL) limit value.
To automatically populate the Upper (UWL) limit value and the Lower (LWL) limit value, select the Auto Fill checkbox. To determine the warning limits, Enact applies the percentage from the Warning Limit data field in Global Configuration to the specification limits. For more information, please see Limits Tab in Configuring Global Settings.
-
To enable events on a warning limit violation, activate the Events slider.
To disable events on a warning limit violation, deactivate the Events slider.
-
-
Reasonable Limits
Typically set well beyond specification limits, you can use reasonable limits to identify (or prevent) data entry errors, such as transposed numbers, since Enact ignores values beyond the reasonable limits in calculations.
By default, Enact automatically populates reasonable limits, ensuring your data collection operators will avoid typographical errors, which results in inaccurate metrics, including Cpk or site grading. To determine the reasonable limits, Enact multiplies the tolerances by the value from the Reasonable Limit data field in Global Configuration. For more information, please see Limits Tab in Configuring Global Settings.
-
In the Reasonable Limit section, type the Upper (URL) limit value and Lower (LRL) limit value.
To automatically populate the Upper (URL) limit value and the Lower (LRL) limit value, select Auto Fill. To determine the reasonable limits, Enact multiplies the tolerances by the value from the Reasonable Limit data field in Global Configuration. For more information, please see Limits Tab in Configuring Global Settings.
-
To enable events on a reasonable limit violation, activate the Events slider.
To disable events on a reasonable limit violation, deactivate the Events slider.
-
-
-
Special Limits Tab
Under the Special Limits tab, you can configure within-piece limits, which are used exclusively for sub-tests, and subgroup limits, which are used to test the plot point against a specification limit.
-
Within Piece Limits
Used exclusively for sub-tests, within-piece limits identify the tolerances or engineering limits for multiple measurements taken for the same test but at different locations. For example, you can verify the roundness of a drilled hole by measuring the diameter of the hole in three indexed locations, and comparing the average of the within-piece values against the within-piece limits.
-
In the Within Piece Limit section, type the Upper (UWP) limit value and Lower (LWP) limit value.
To automatically populate the Upper (UWP) limit value and the Lower (LWP) limit value, select the Auto fill using Specification Limit checkbox.
-
To enable events on a within-piece limit violation, activate the Events slider.
To disable events on a within-piece limit violation, deactivate the Events slider.
-
-
Subgroup Limits
Subgroup limits are used to test the plot point against a specification limit. When collecting attribute data, you must use subgroup limits, where the plot point represents a total sample defect count. When collecting variable data, you can use subgroup limits, which are defined for the average of several measurements.
-
In the Subgroup Limit section, type the Upper (USG) limit value and Lower (LSG) limit value.
To automatically populate the Upper (USG) limit value and the Lower (LSG) limit value, select the Auto fill using Specification Limit checkbox.
-
To enable events on a subgroup limit violation, activate the Events slider.
To disable events on a subgroup limit violation, deactivate the Events slider.
-
-
-
MAV Method Tab
Under the MAV Method tab, you can configure the Maximum Allowable Variation Method, which is the tolerance below or above the stated content within which the US government permits a limited number of packs to be included in the lot. By default, Enact uses the same units for the MAV method as it does for the specification limits.
Enact only triggers events on individual MAV violations. Enact will never trigger events on Max % violations.
-
To manually set the Units data field, deselect Same as Manufacturing Limit Units and in the Units drop-down list, select the desired unit.
By default, the MAV method uses the same units as the specification limits.
- In the Label Stated Content (LSC) data field, type the label content or weight defined on the package. This is the quantity of product the consumer is buying. For weight control, the stated content is often referred to as Label Weight, Declared Weight, Nominal Weight, or Target Weight.
-
To set MAV Upper, expand MAV Upper, and then do the following:
- In the MAV Upper data field, type the tolerance above the Stated Content within which the US government permits a limited number of packs to be included in the lot.
- In the Max % > MAV Upper data field, type the maximum allowable percentage above the MAV Upper.
-
To enable events on a MAV upper limit violation, activate the Events slider.
To disable events on a MAV upper limit violation, deactivate the Events slider.
-
To set MAV Lower, expand MAV Lower, and then do the following:
- In the MAV Lower data field, type the tolerance below the Stated Content within which the US government permits a limited number of packs to be included in the lot.
- In the Max % < MAV Lower data field, type the maximum allowable percentage below the MAV Lower.
-
To enable events on a MAV lower limit violation, activate the Events slider.
To disable events on a MAV lower limit violation, deactivate the Events slider.
-
-
T1T2 Method Tab
Under the T1T2 Method tab, you can configure the T1T2 Method, where both T1 and T2 set points are dividing lines between two weight zones. T1 Upper requires weight above the stated content allowed by the European Union and the average of the batch must exceed the Stated Content. T2 Upper data field requires weight above the stated content allowed by the European Union which must be above T1 and does not exceed 2.5% of the batch.
Enact only triggers events on individual T2 violations. Enact will never trigger events on Max % violations. T1 events will only be triggered only if the event toggle is on. The event toggle is set to OFF by default. T1 events that are triggered must be confirmed by the user to take affect. For more information on setting conditions for T1 events, see Creating Conditions.
-
To manually set the Units data field, deselect Same as Manufacturing Limit Units and in the Units drop-down list, select the desired unit.
By default, the T1T2 method uses the same units as the specification limits.
- In the Label Stated Content (LSC) data field, type the label content or weight defined on the package. This is the quantity of product the consumer is buying. For weight control, the stated content is often referred to as Label Weight, Declared Weight, Nominal Weight, or Target Weight.
-
To set T1T2 Upper, expand T1T2 Upper, and then do the following:
- In the T2 Upper data field, type the weight above the Stated Content allowable by the European Union, which must be above T1 and cannot exceed 2.5% typical of the batch.
- In the T1 Upper data field, type the weight above the Stated Content allowable by the European Union, which can be of unlimited quantity, though the average of the batch must exceed the Stated Content.
- In the Max % between T1T2 Upper data field, type the maximum allowable percentage between T1T2 Upper.
- In the Max % > T2 Upper data field, type the maximum allowable percentage above T2 Upper.
-
To enable events on a T1 or T2 upper limit violation, activate the Events slider.
To disable events on a T1 or T2 upper limit violation, deactivate the Events slider.
-
To set T1T2 Lower, expand T1T2 Lower, and then do the following:
- In the T2 Lower data field, type the weight below the Stated Content allowable by the European Union.
- In the T1 Lower data field, type the weight below the Stated Content allowable by the European Union, which cannot exceed 2.5% (typical) of the batch.
- In the Max % between T1T2 Lower data field, type the maximum allowable percentage between T1T2 Lower.
- In the Max % < T2 Lower data field, type the maximum allowable percentage below T2 Lower.
-
To enable events on a T1 or T2 lower limit violation, activate the Events slider.
To disable events on a T1 or T2 lower limit violation, deactivate the Events slider.
-
-
- Select Save.


