Creating Date Code Configurations
Using this procedure, you will create the date code configuration.
- Select Access Menu and then selectFeature | Date Code Configurations.
-
-
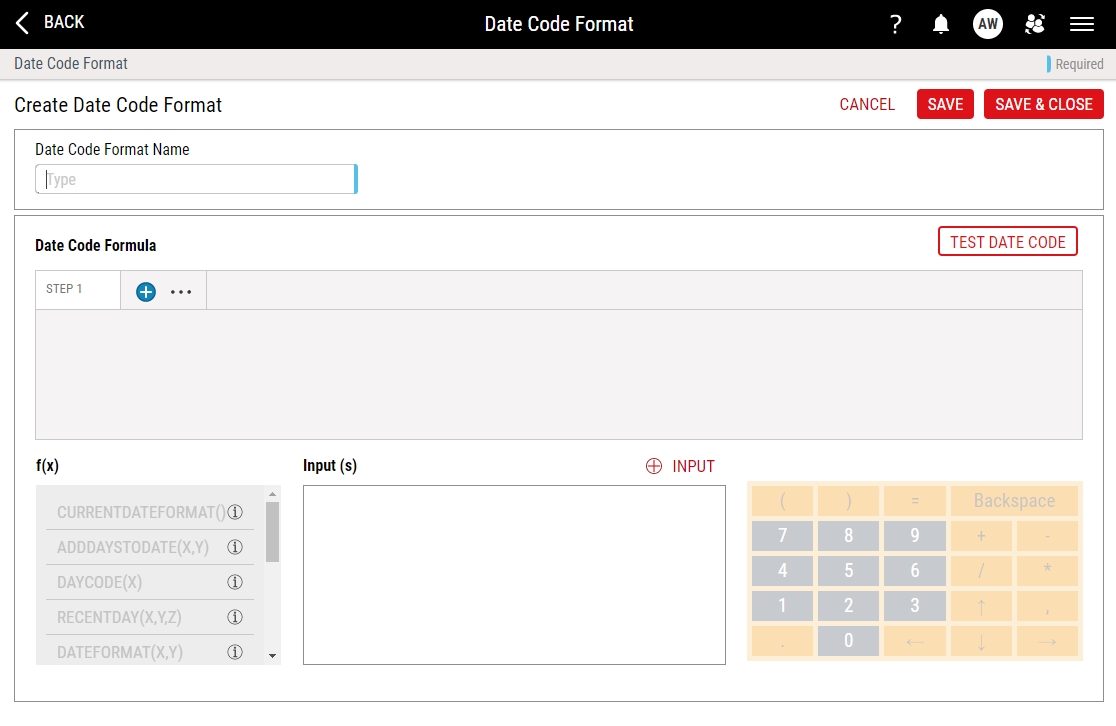
In the Date Code Format Name data field, type the format name.

- Build out your date code formula by adding steps and selecting functions and inputs until you have the finaloutput.
 Handling Functions - f(x)
In the f(x) section you can select predefined functions to add to your date code formula steps.
In the date code formula text box, select inside the desired step.
Select the desired function.
Time and dates will be provided based on the data collection time, not your local system time.
CURRENTDATEFORMAT () - date as per process time zone.
ADDDAYSTODATE (X,Y) - add days to date and returns a value. First argument (x) is date and second (Y) is number of days to add.
DAYCODE (X) - returns day of the week based on A,B,C,D code where A is Monday. Argument is date.
RECENTDAY (X,Y,Z) - generic function that returns a date value based on the arguments. Example: (2,1, date) would return the closest Monday to the date provided going backwards.
First argument (x) is the direction. Value of 1 means forward. Value of 2 means backward.
Second argument (y) is day of the week with 1 being Monday, 2 Tuesday, etc.
Third argument (z) is the date to work from.
MONTHCODE (X) - returns month based on A,B,C,D where January is A. Argument is date.
EXTRACTSTRING (W,X,Y,Z) - returns value from substring showing index, length and direction. First argument (w) is the the substring where you need to start. Second argument (x) is the number of characters to retrieve from the string. Third argument (y) is the direction (1-from start or 2-from end). Fourth argument is the actual string.
Example: Extractstring(1,2,1,InputString) returns 2 starting characters from InputString.TIMEFORMAT (X,Y) - returns formatted time based on time code. First argument (x) is the time code format. Second argument (y) is the datetime. Supported formats are all based on a 24-hour clock:
(T0:00) 4-digit clock with separator returns a value such as 13:45 or 05:30
(T000) 4-digit clock without separator returns a value such as 1345 or 0530
(T0) 2-digit clock returns a value such as13 or 05
WEEKFORMAT (X,Y) - returns formatted week value based on week code. First argument (x) is the format for the first week of the year; either "W0" for the first week being week 0, or "W1" for the first week being week 1. The second argument (y) is the datetime.
DAYFORMAT (X,Y) - returns formatted day value based on day code. First argument (x) is the day code. Second is the datetime. Supported formats for the day code:
(DDD) 3-letter uppercase returns MON, TUE, WED
(ddd) 3-letter lowercase returns mon, tue, wed
(DD) 2-letter uppercase returns MO,TU,WE
(dd) 2-letter lowercase returns mo, tu, we
(YDO) 3-digit day of the year with Jan 1 being 0 returns 000, 001, 002
(YD1) 3-digit day of the year with Jan 1 being 1 returns 001, 002, 003
(D#) 2-digit day of the month with first day being 1 returns 01, 02, 03
(C) 1-letter day of week code returns A for Monday, B for Tuesday, C for Wednesday
MONTHFORMAT (X,Y) - returns formatted month value based on month code. First argument (x) is the month code. Second argument (y) is the datetime. Supported formats for the month code:
(MMM) 3-letter uppercase returns JAN, FEB, MAR
(mmm) 3-letter lowercase returns jan, feb, mar
(MM) 2-letter uppercase returns JA, FE, MA
(mm) 2-letter lowercase returns ja, fe,ma
(M0) 2-digit month with Jan being 0 returns 00, 01, 02
(M1) 2-digit month with Jan being 1 returns 01, 02, 03
(M#) 2-digit month with Jan being 1 returns 01, 02, 03
(M) 1-letter month uppercase returns A for January, B for February, C for March
(m) 1-letter month lowercase returns a for January, b for February, c for March
YEARFORMAT (X,Y) - returns formatted year value based on year code. First argument (x) is the year code. Second argument (y) is the datetime. Supported formats for the year code.
(Y###) 4-digit year returns 2012, 2013, 2014
(Y#) 2-digit year returns 12, 13, 14
DAYFORMATWITHCOUNTRYCODE(X,Y,Z) returns formatted year value based on daycode and countrycode. First argument (x) is the daycode. The second argument (y) is the countrycode; for example, US for USA and CA for Canada. The third argument (z) is the datetime. Supported formats for the day code:
(DDD) 3-letter uppercase returns MON, TUE, WED, THU, FRI, SAT, SUN
(ddd) 3-letter lowercase returns mon, tue, wed, thu, fri, sat, sun
(DD) 2-letter uppercase returns MO, TU, WE, TH, FR, SA, SU
(dd) 2-letter lowercase returns mo, tu, we, th, fr, sa, su
Two country codes are currently supported. They are, US for USA and CA for Canada. The supported day codes are similar for both US and CA.
MONTHFORMATWITHCOUNTRYCODE(X,Y,Z) returns formatted month value based on month code and country code. First argument (x) is the monthcode. The second argument (y) is the countrycode; for example, US for USA and CA for Canada. The third argument (z) is the datetime.
Supported formats for the month code with US as country code:
(MMM) 3-letter uppercase returns JAN, FEB, MAR, APR, MAY, JUN, JUL, AUG, SEP, OCT, NOV, DEC(mmm) 3-letter lowercase returns jan, feb, mar, apr, may, jun, jul, aug, sep, oct, nov, dec
(MM) 2-letter uppercase returns JA, FE, MR, AP, MA, JN, JL, AU, SE, OC, NO, DE
(mm) 2-letter lowercase returns ja, fe, mr, ap, ma, jn, jl, au, se, oc, no, de
Supported formats for the month code with CA as country code:
(MMM) 3-letter uppercase returns JAN, FEB, MAR, APR, MAY, JUN, JUL, AUG, SEP, OCT, NOV, DEC
(mmm) 3-letter lowercase returns jan, feb, mar, apr, may, jun, jul, aug, sep, oct, nov, dec
(MM) 2-letter uppercase returns JA, FE, MR, AL, MA, JN, JL, AU, SE, OC, NO, DE
(mm) 2-letter lowercase returns ja, fe, mr, al, ma, jn, jl, au, se, oc, no, de
- Handling Input(s)
In the Inputs section you can select input from other parts of Enact to add to your date code formula.
In the date code formula text box, select inside the desired step.
Select INPUT to open Add Input.
From the drop-down select to add a Part or Process Entity.
Select the Attribute and Tag Group, if part is selected.
For Parts you are limited to selecting an attribute from a Tag Group.
Or,
Select the process hierarchy abbreviation as the Attribute, if process is selected.
The available process hierarchy abbreviations are: Process Abbreviation, Site Abbreviation, Company Abbreviation, Division Abbreviation, Region Abbreviation, and Department Abbreviation.
Select Save.
- Handling Outputs
Using outputs, you store the result of a calculation step, either in a temporary output for transfer to a later step or in a final step that will output the configuration to match.
Date code configurations can have only one finaloutput step.
- Creating Temporary Output
- In the desired step, select after the equal sign (=). You can only create an output after the equal sign (=).
Type the name of the temporary output, and then press TAB. Enact creates a temporary output, identified by the dashes around the name. For example, type currentdatevalue, and then press TAB.

- Using Temporary Output as Input
- In the desired step, select before the equal sign (=).
- To locate the temporary output, begin typing a string within the temporary output. For example, to locate currentdatevalue, you can type curr or you can type dat.
Using your keyboard, press the arrow keys to highlight the desired item, and then press ENTER. Enact uses a temporary output as a feature input, identified by the dashes around the name. You cannot use the mouse to make a selection. Using your keyboard, you must use the arrows keys and ENTER key.

- Creating Final Ouput
- In the desired step, select after the equal sign (=). You can only create an output after the equal sign (=).
Type the name of the final output, and then press TAB. Enact creates a temporary output, identified by the dashes around the name. For example, type finaloutput, and then press TAB.

Select the output that you just created, and in the Configure Output dialog box, select Final Date Code Output. You will see the output change to a purple box with a solid line around it.

- Removing Ouput
In the desired step, select before or after the desired output.
To delete the output to the left, press BACKSPACE until you remove the output.
To delete the output to the right, press DEL until you remove the output.
-
If, during production, only part of the date code will be verified, which is sometimes necessary, at Partial Date Code Verification:
-
Click the pill icon to enable it.
-
In the text box, for each date code character that will be validated, enter the letter M and for each character that won't be validated, enter the letter X. For example, if the date code is 12 characters long but only the first 8 will be validated, enter: MMMMMMMMXXXX. Only these two letters can be entered in the text box and the total number of characters entered must match the total number of characters in the date code.
-
-
Test the date code configuration to confirm it displays the code as intended. To do this:
-
Select Test Date Code.
-
In the Test Date Code window, you may be prompted to enter the values for steps which require input.
-
Select Test to see the resulting date code in the final output field.
-
-
Select Save, or select Save & Close to save and close the page.

